When it comes to winning in PlayerUnknown’s Battlegrounds, choosing the right place to land on the island at the start of each round is crucial. Not only will your intended drop zone dictate the type of weaponry and equipment you will likely start the game with, the geographical position could also see you taken out by the ever-shrinking lethal barrier long before you see another player.
Picking your point of entry isn’t as straightforward as heading for one favorite spot each time though. The plane’s path constantly changes, alternating which parts of the island can be reached from the start. Fortunately, we’ve gathered together thirteen of the best starting points for you to slot into your compendium of tricks which should let you hit the ground running.
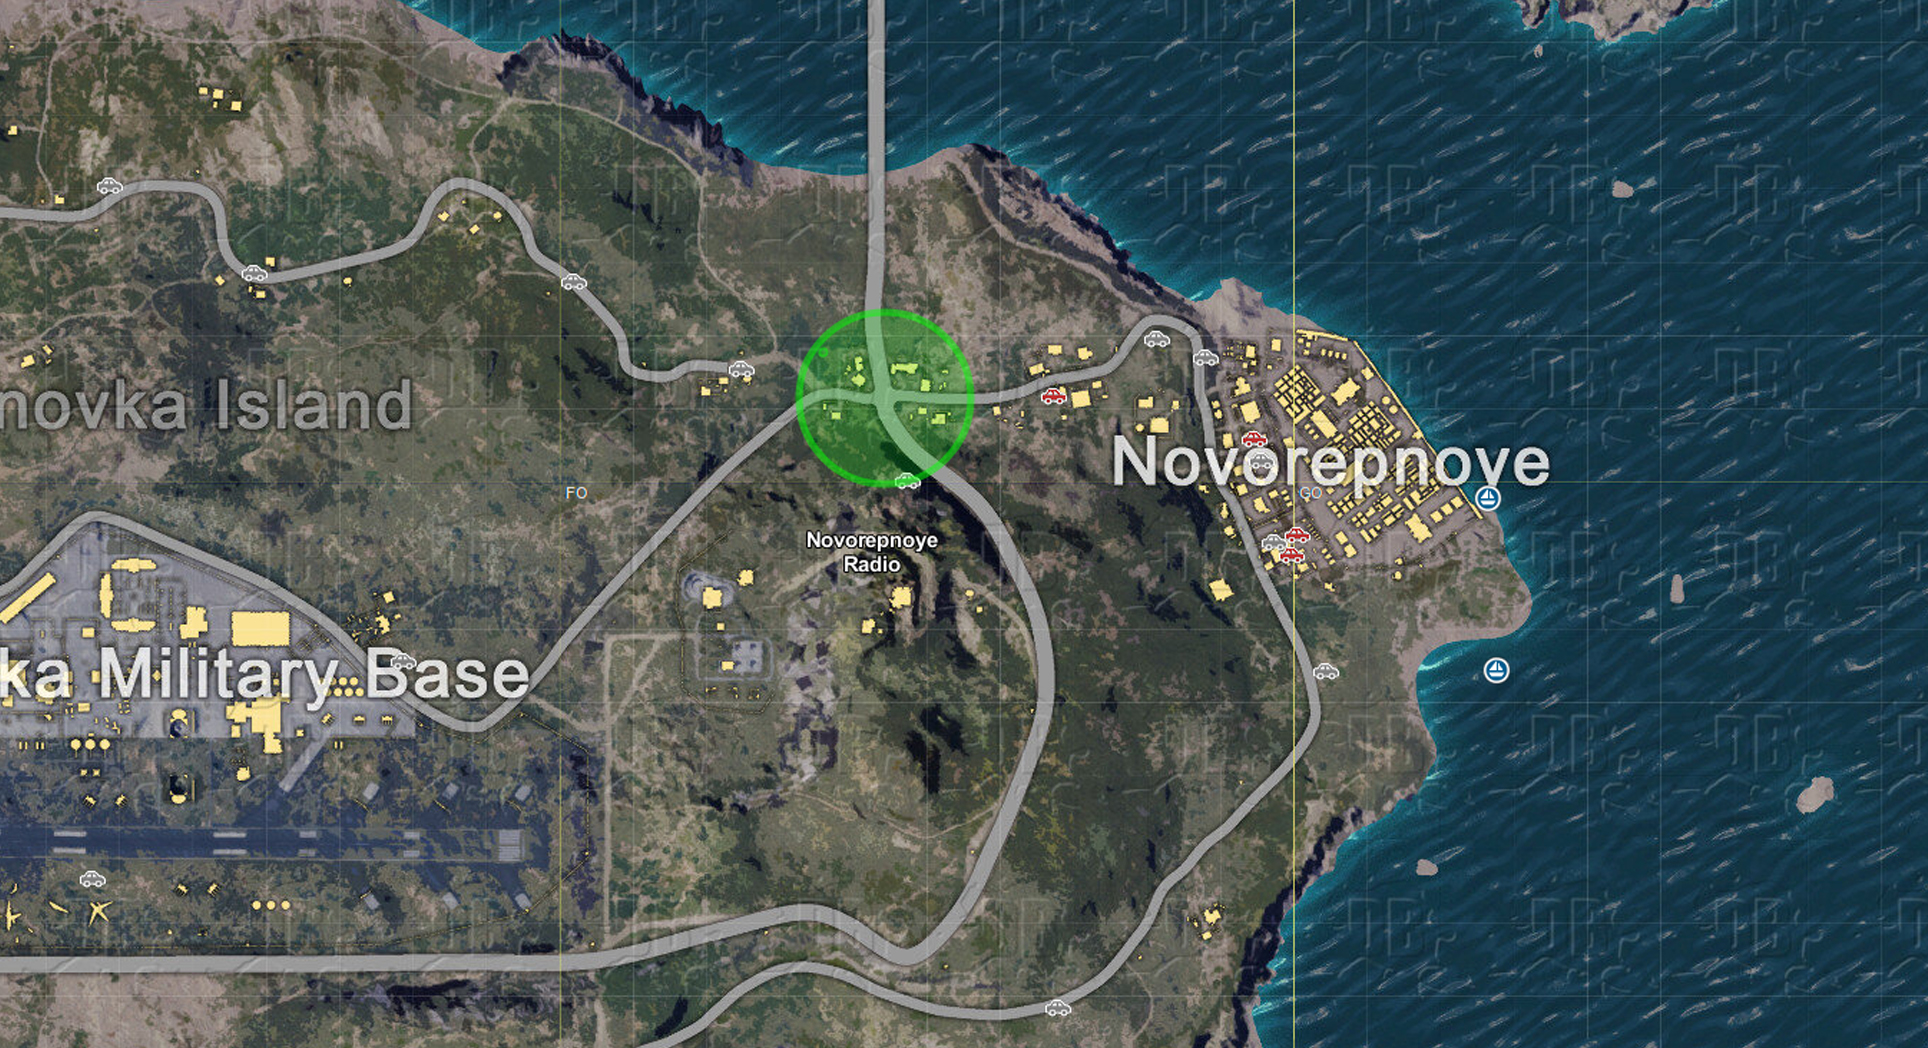
1. West of Novorepnoye (F4:N8)
A great starting spot for beginners, this intersection has it all. The nearby houses provide plenty of opportunities for weapon and armor drops, and there are several potential vehicle spawn points along the road and coastline heading west. The majority of players tend to avoid going for this segregated southern island as the bridges make for natural choke points, but it’s rare for people to be staking these pathways out in the early game so you should be able to gather items in peace. Special care should be taken with town of Novorepnoye to the east however, as this is a popular drop zone for people looking for military-grade gear.
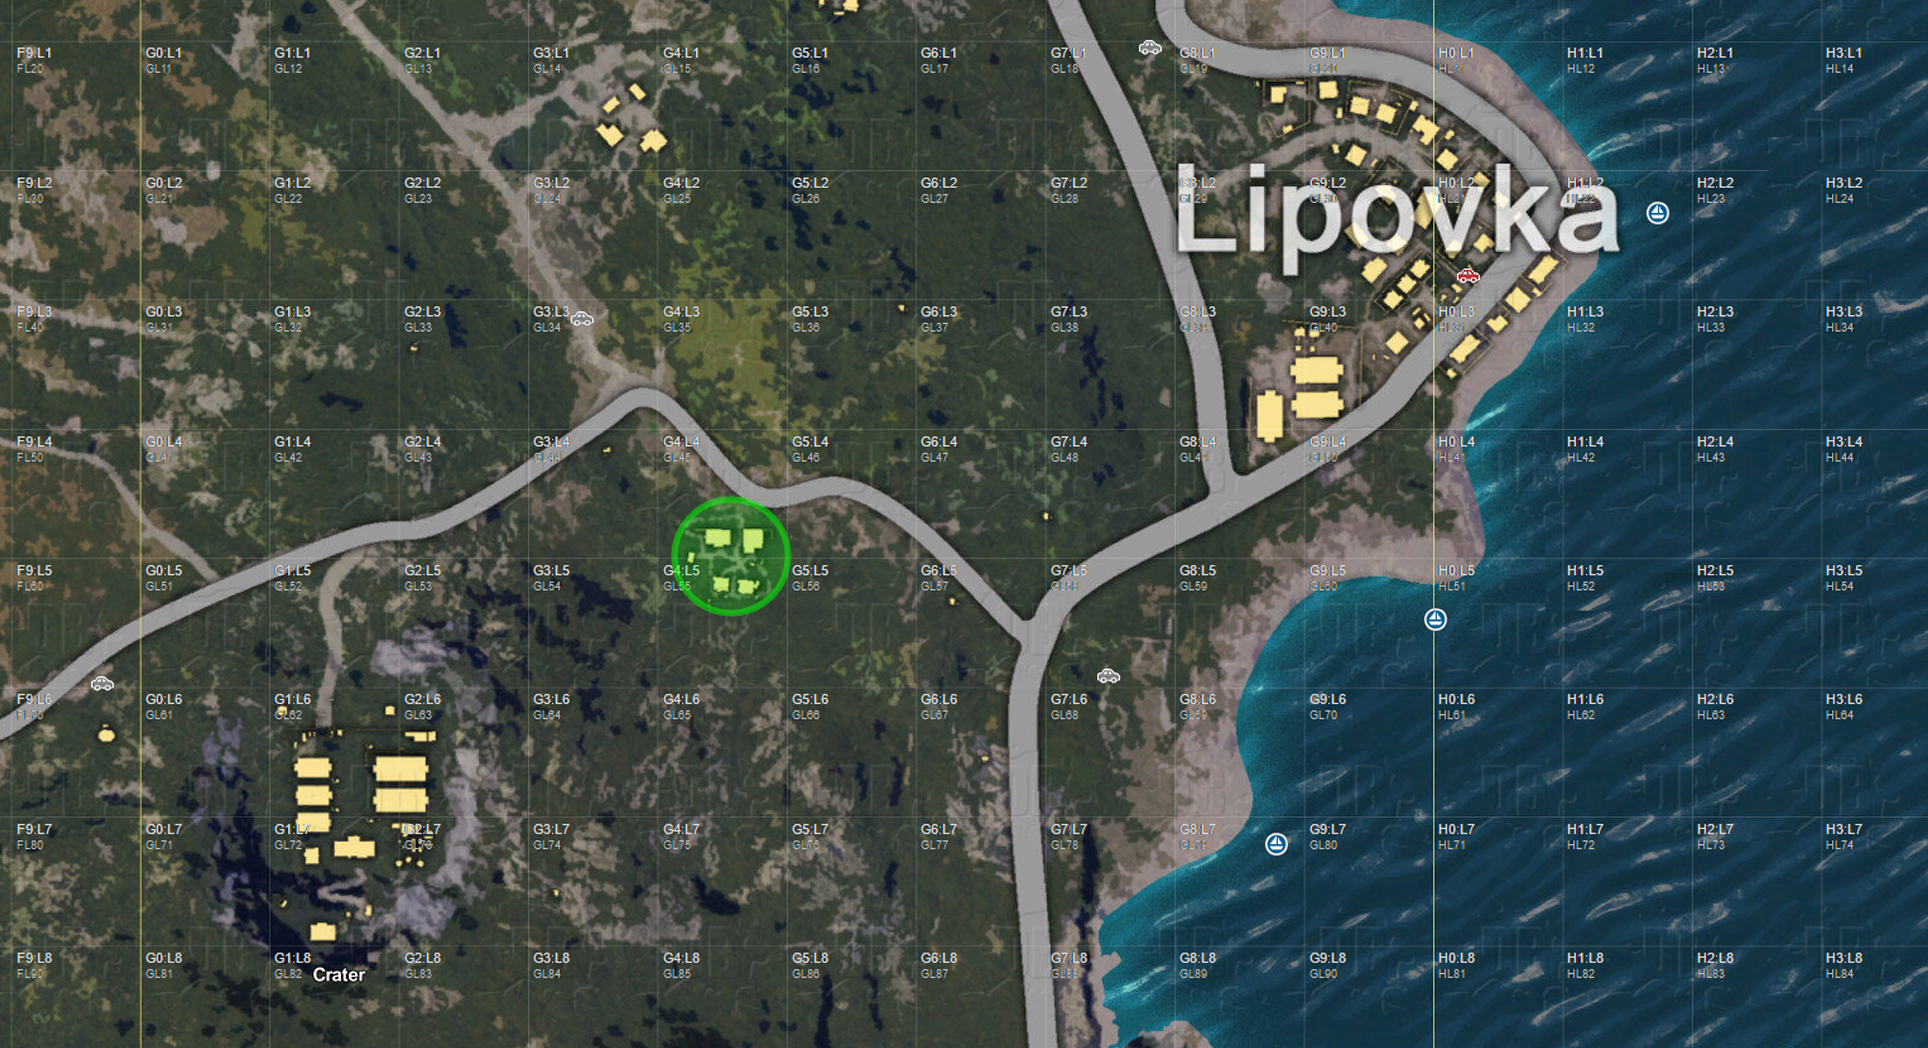
2. Southwest of Lipovka (G4:L5)
If it’s a peaceful landing you’re after, this sleepy cluster of houses nestled a short jog away from Lipovka offers the perfect spot. Whilst it’s unlikely you’ll find any high-powered weapons or armor inside, it’s almost guaranteed to contain at least one firearm to get you started. From here, you’re free to adapt your plan accordingly by either heading up to Lipovka in the northeast, or by checking out the crater to the southwest. There are also two potential car spawns at either entrance to Lipovka, which can help you cross the island if the safe zone spawns too far away.
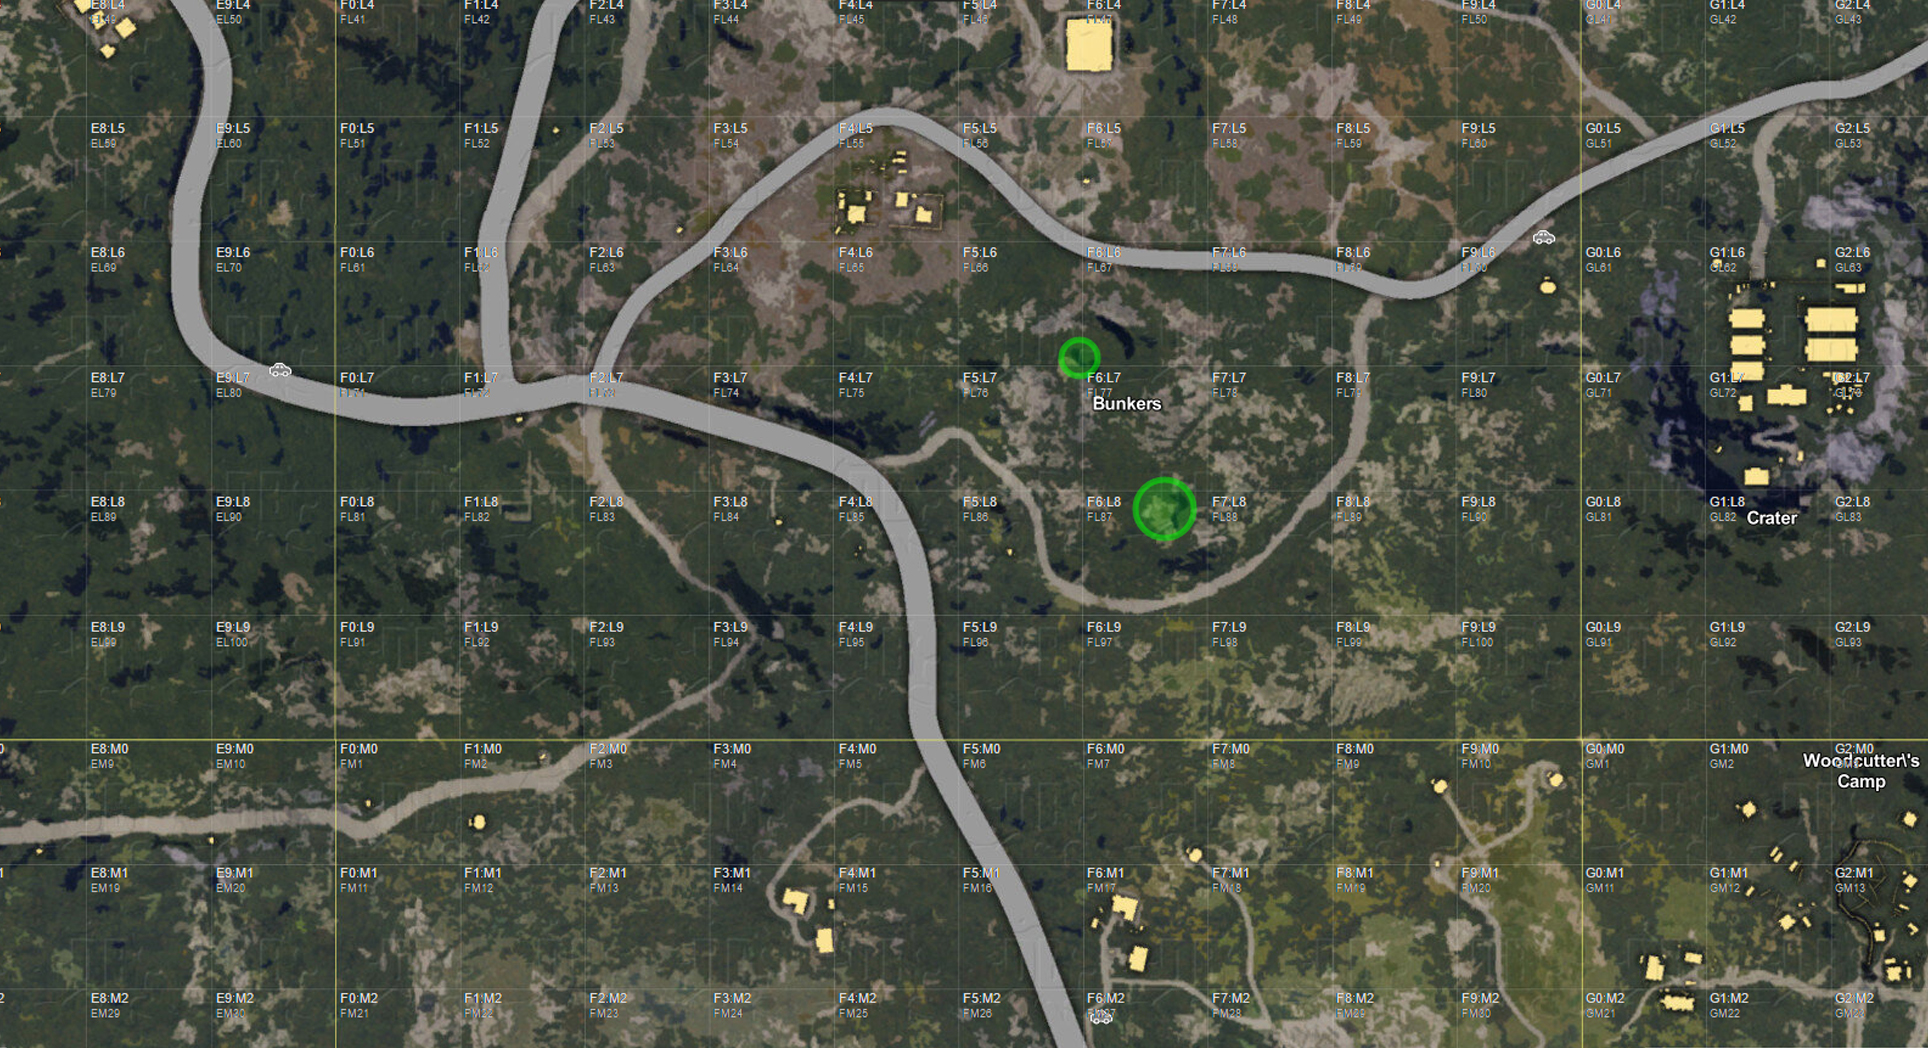
3. Bunkers north of Mylta (F6:L8)
What was once a well kept secret, these hidden tunnels are nigh-impossible to locate unless you know where to look for them. With several entrances scattered across a seemingly empty hillside, this underground bunker has a very high frequency of weapon spawns, making it an ideal dropzone if the plane travels nearby. Those looking to plunder the tunnels should be cautious however, as anyone else dropping into this otherwise uninteresting area will likely have the same idea, and you’ll probably have to fight for your right to plunder these sunken halls.
The bunker’s close proximity to the central area of the island makes it perfect for changing plans on the fly once the safe zone has been revealed, but a lack of any reliable vehicle spawns in the surrounding area can sometimes cause issues.

4. North of Stalber (F4:I5)
Occasionally the plane will skip the majority of the island and miss most of the more lucrative spawn points. If that happens along the northern or eastern edge, choosing to jump out at this unassuming cluster of buildings north of Stalber is a good plan. Because these buildings are so close to the coastline, most players will overlook them, making the potential loot inside almost entirely uncontested. There’s a potential vehicle spawn right outside too, and if luck is on your side, you can use this early advantage to race along in either direction towards one of the major settlements to look for better gear.
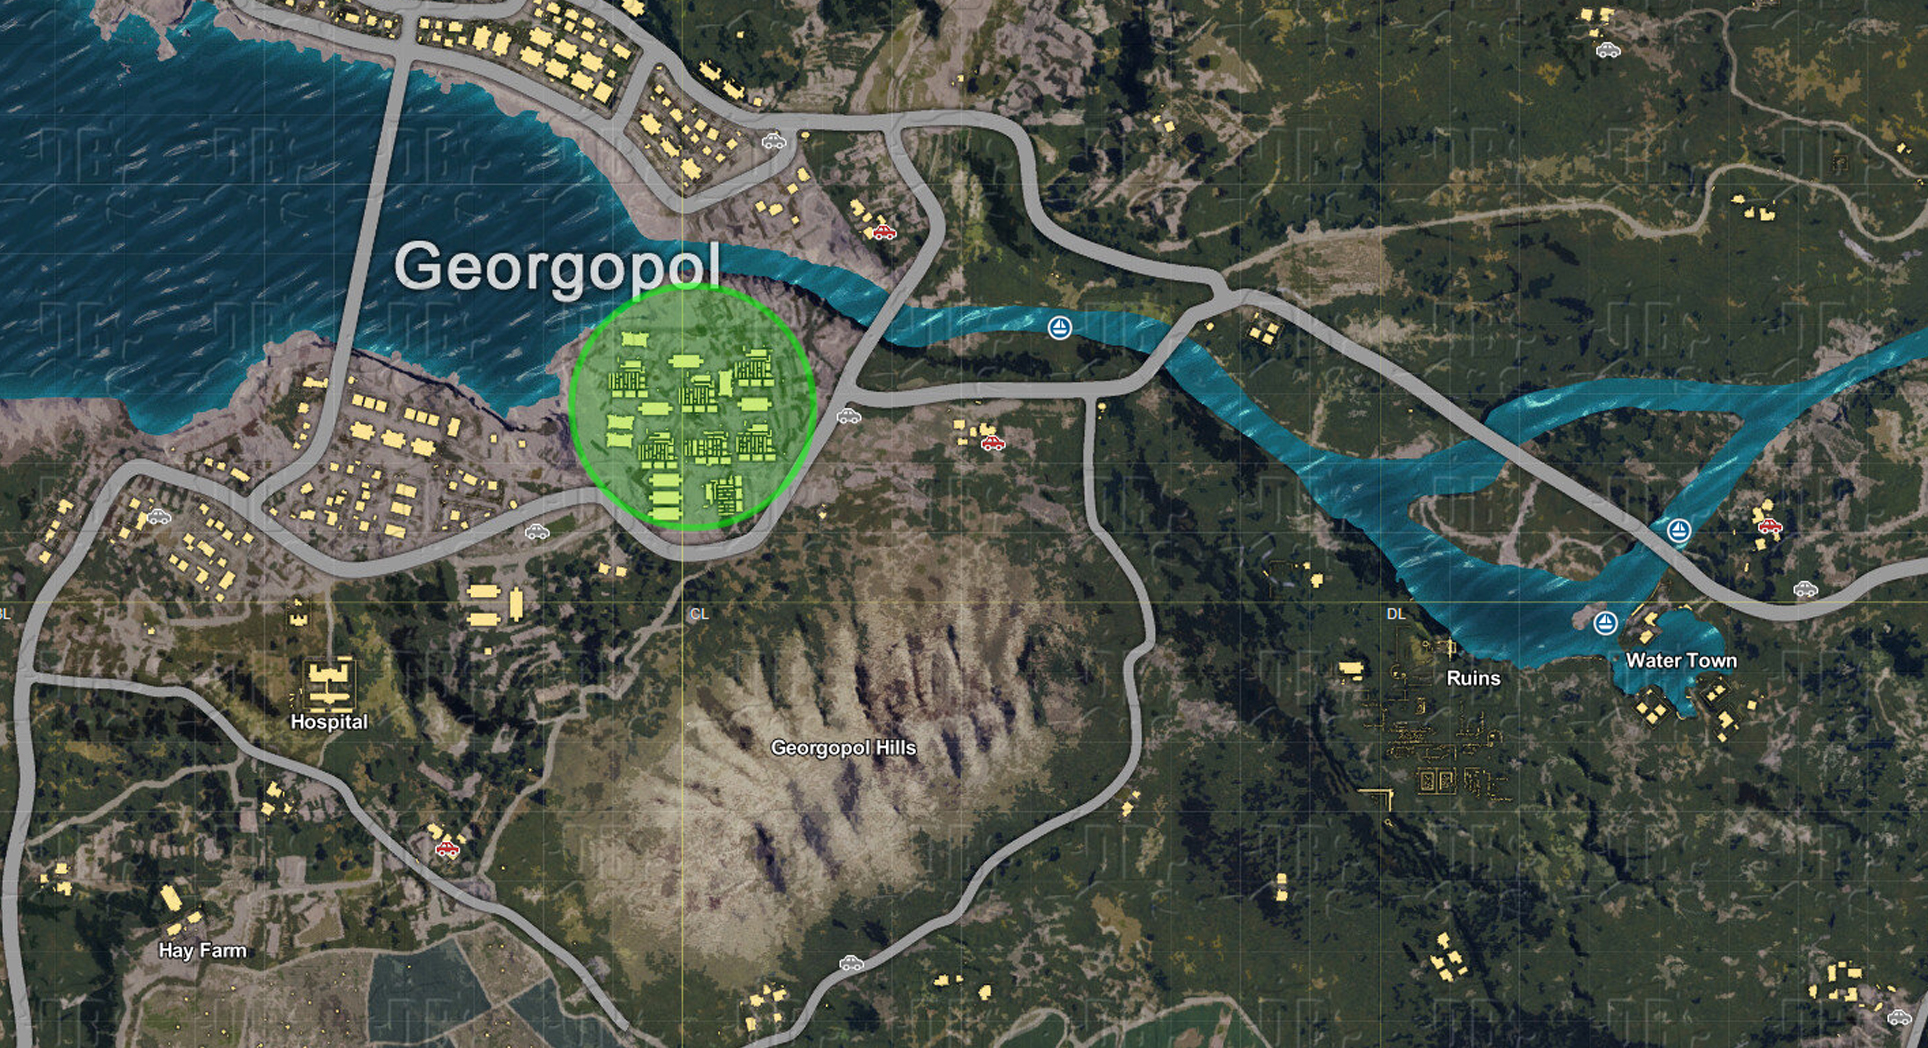
5. Geogopol shipping yard (B10:K7)
This shipping yard located at the mouth of the river in the western town of Geogopol is a fan favorite thanks to it’s desirable military-grade loot spawns, it’s close proximity to built up urban areas that are likely to be full of extra loot spawns, and it’s high number of entry points which makes it easier to get in and out without being attacked. Anyone looking to drop here will almost certainly be in for a fight though, so make sure that you find a gun immediately or you’ll quickly become fodder for someone else.

6. School south of Rozhok (E1:L2)
Another highly contested area, this school acts as a natural congregation spot for many players due to its central location on the map. The school also boasts a large number of potential military-grade gear spawns, making it a hotbed of activity throughout the early game. Vehicle spawns are dotted all around this focal point too, making it the ideal spot to land for someone willing to risk the odds. Those looking for a head start should try and land on the roof when possible, as this could potentially place you right on top of your first weapon spawn, giving you the advantage.
Anyone who does land here should pay special care when leaving however. The nearby apartment buildings are also fairly popular, and players have been known to camp out on the rooftops to catch out anyone looking to enter or exit the school.
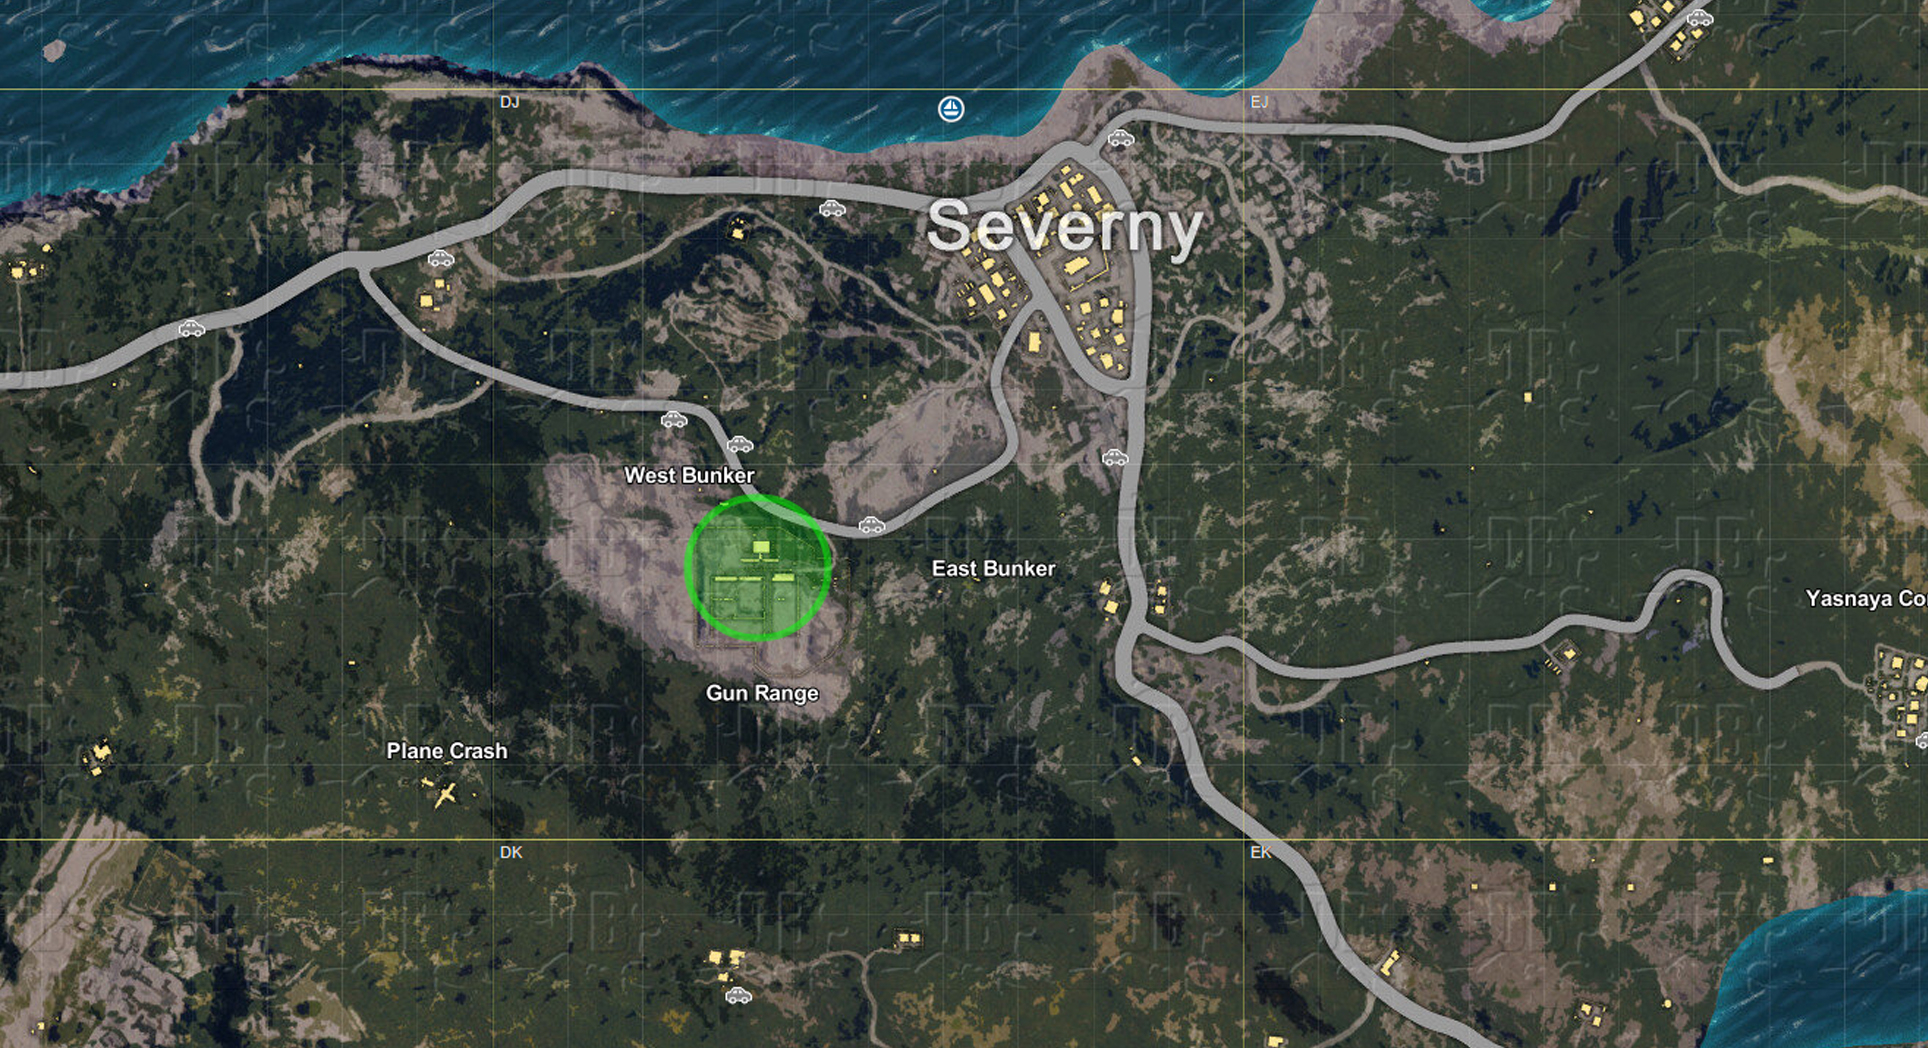
7. Gun range southwest of Severny (D3:J6)
This toybox of military-grade weapon spawns is hiding in plain sight a short distance away from the northern town of Severny, and since it isn’t clear that the area is a gun range from looking at the map alone, this hidden gem is often quieter than most of the other item-rich areas. You’ll still have to fight off one or two aggressors if you choose to land here, and there’s a severe lack of effective cover if you find yourself up against a better armed foe. If you’re lucky though, this area can easily kit you out for the rest of the game, and there are several nearby potential vehicle spawns to the north that can get you on the move in no time.
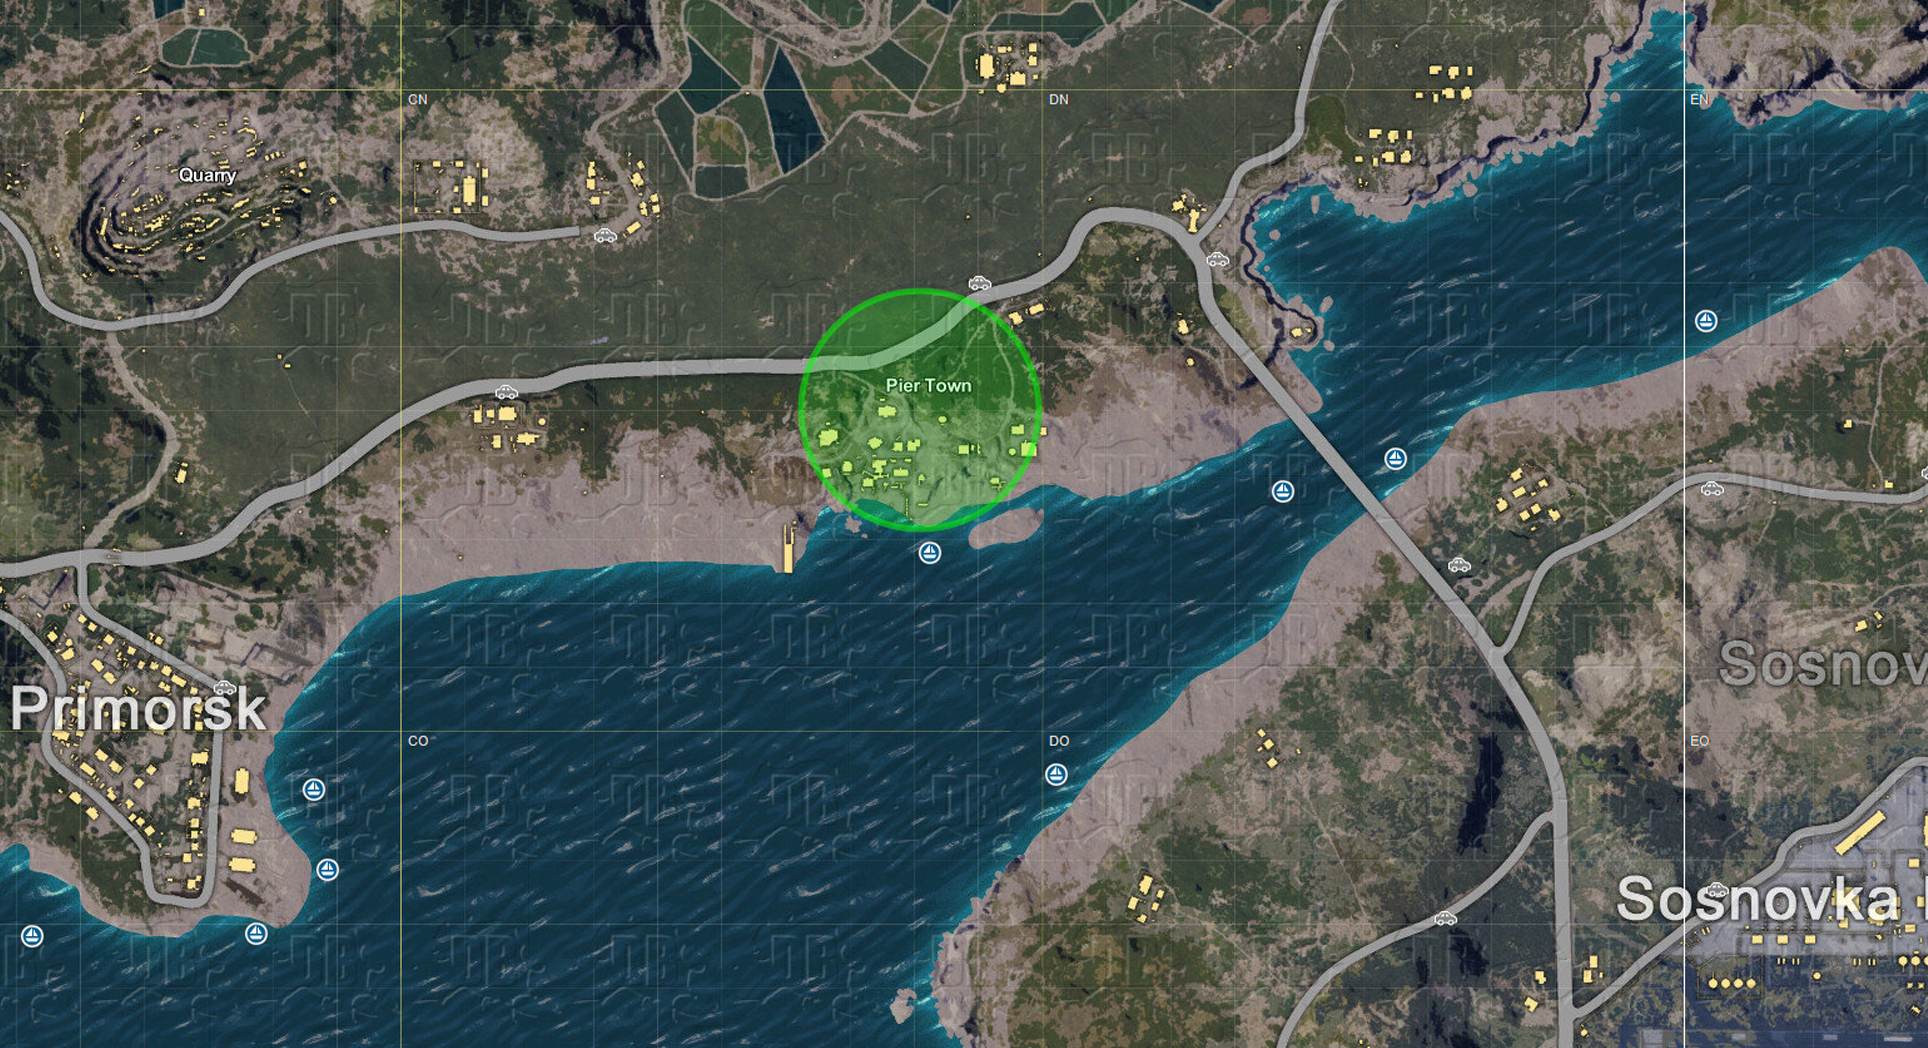
8. East of Primorsk (C8:N5)
This pier town to the east of Primorsk serves two purposes. The high number of houses makes it an ideal landing zone to get kitted out with weapons and equipment, due to the large number of potential spawn points, and the sloped nature of the area makes it easy to sneaky around and flank any nearby players as you search for loot.
Alternatively, those wanting to play more aggressively can choose to land here to get some basic equipment before heading east to the connecting bridge. Anyone that chose to land on the opposite island will likely have to come across, making this an excellent location for an ambush, providing you can get set up quick enough to catch any migrating players that are traveling on foot.

9. Sosnovka Military Base (E4:O2)
This southern encampment offers little to no cover with its wide, open spaces and large runway. The open plan makes it easy for moving players to be spotted against the stark concrete surroundings, and there’s a large open field in every direction which makes escaping unseen difficult. However, these factors can easily be turned in your favor if you’re lucky enough to find a weapon before anyone else does. If you’re feeling brave or bloodthirsty, this mini crucible is the ideal place to land, and anyone capable of dispatching the immediate competition can be sure to have the best gear possible during the early stages of the game.
The biggest downside to landing here is that there are no immediate vehicle spawns in the vicinity, forcing you to hike to the road in the north to find a decent way to get off of the island when the safe zone appears.
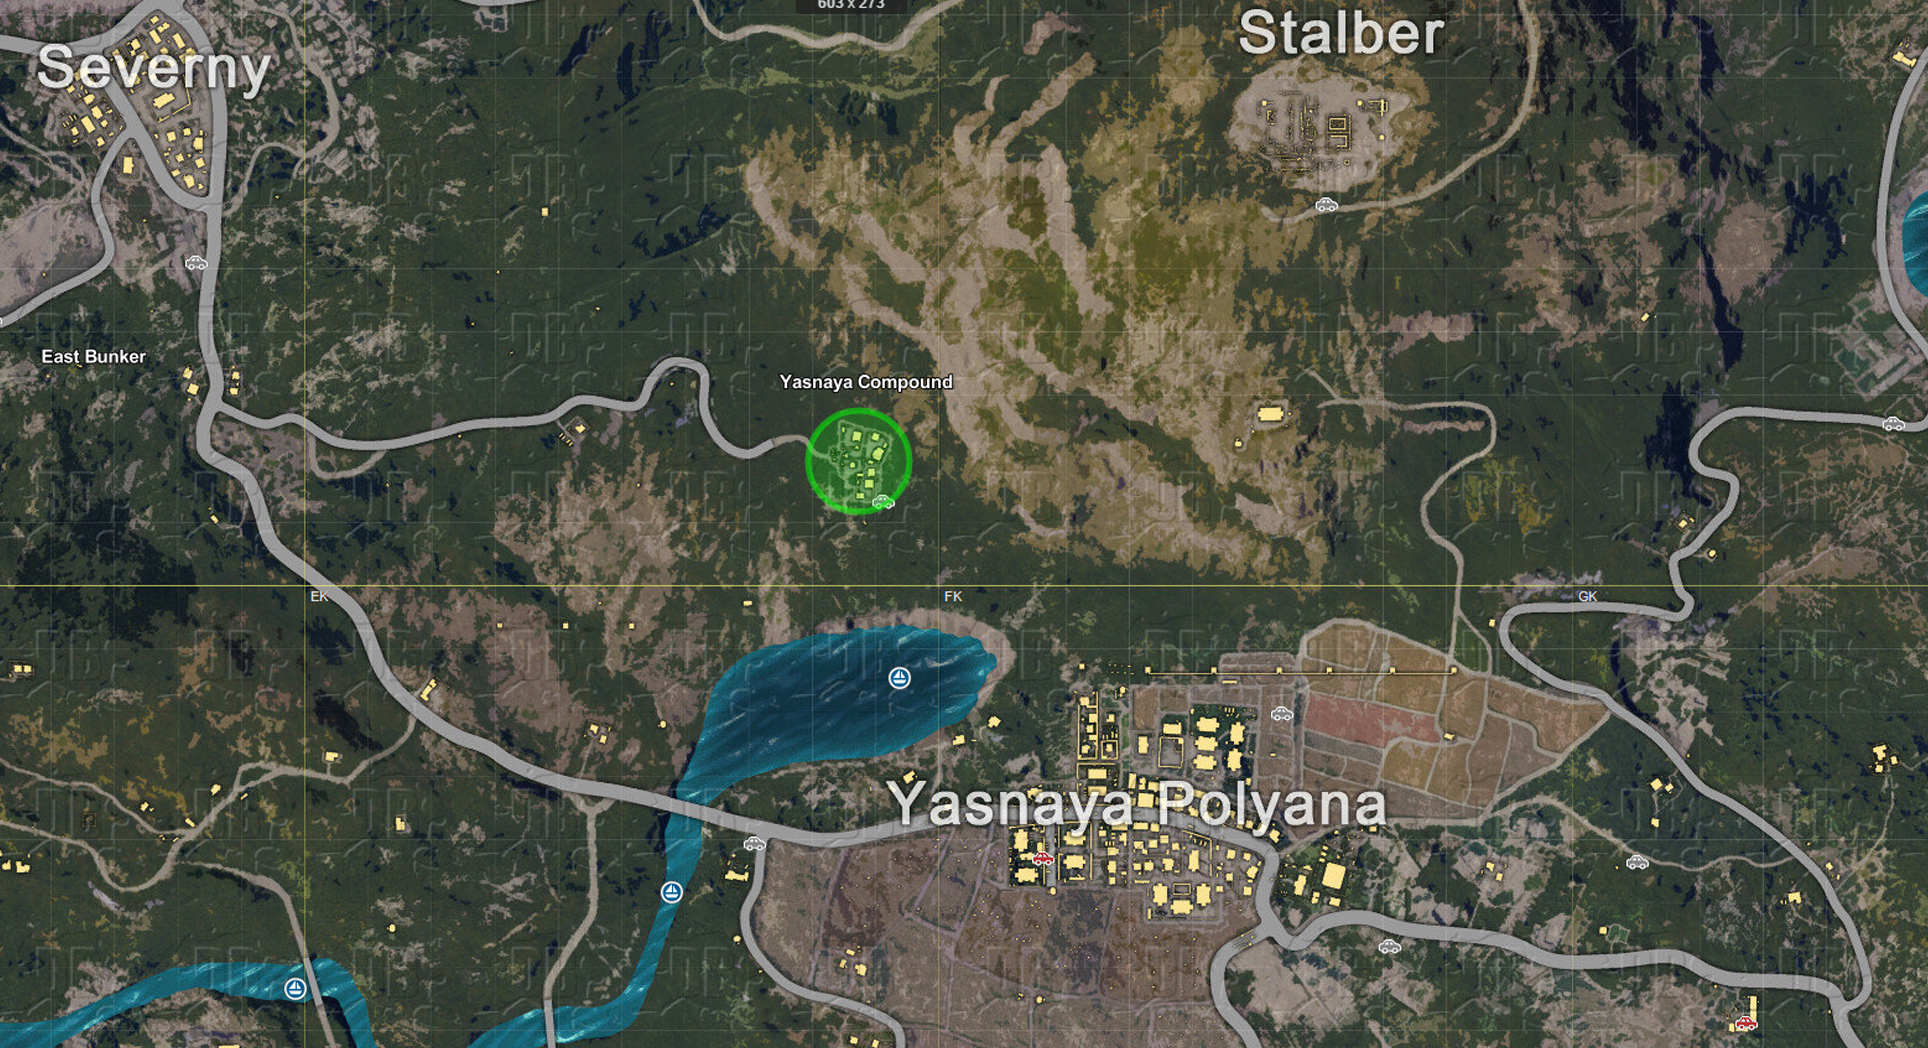
10. North of Yasnaya Polyana (E8:J8)
This small compound to the north of Yasnaya Polyana not only offers a fair amount of potential gear spawns, it is also positioned perfectly to help you scout out the nearby military town to the south. The barren area to the north means you’re unlikely to be approached from that direction, leaving you free to focus your attention on the town below as you plan your approach. This spot also makes for an excellent sniping point if you’re lucky enough to find a rifle effective at range, as players are likely to migrate west from the town along the road, leaving them vulnerable to an unsuspecting attack as they cross the bridge.
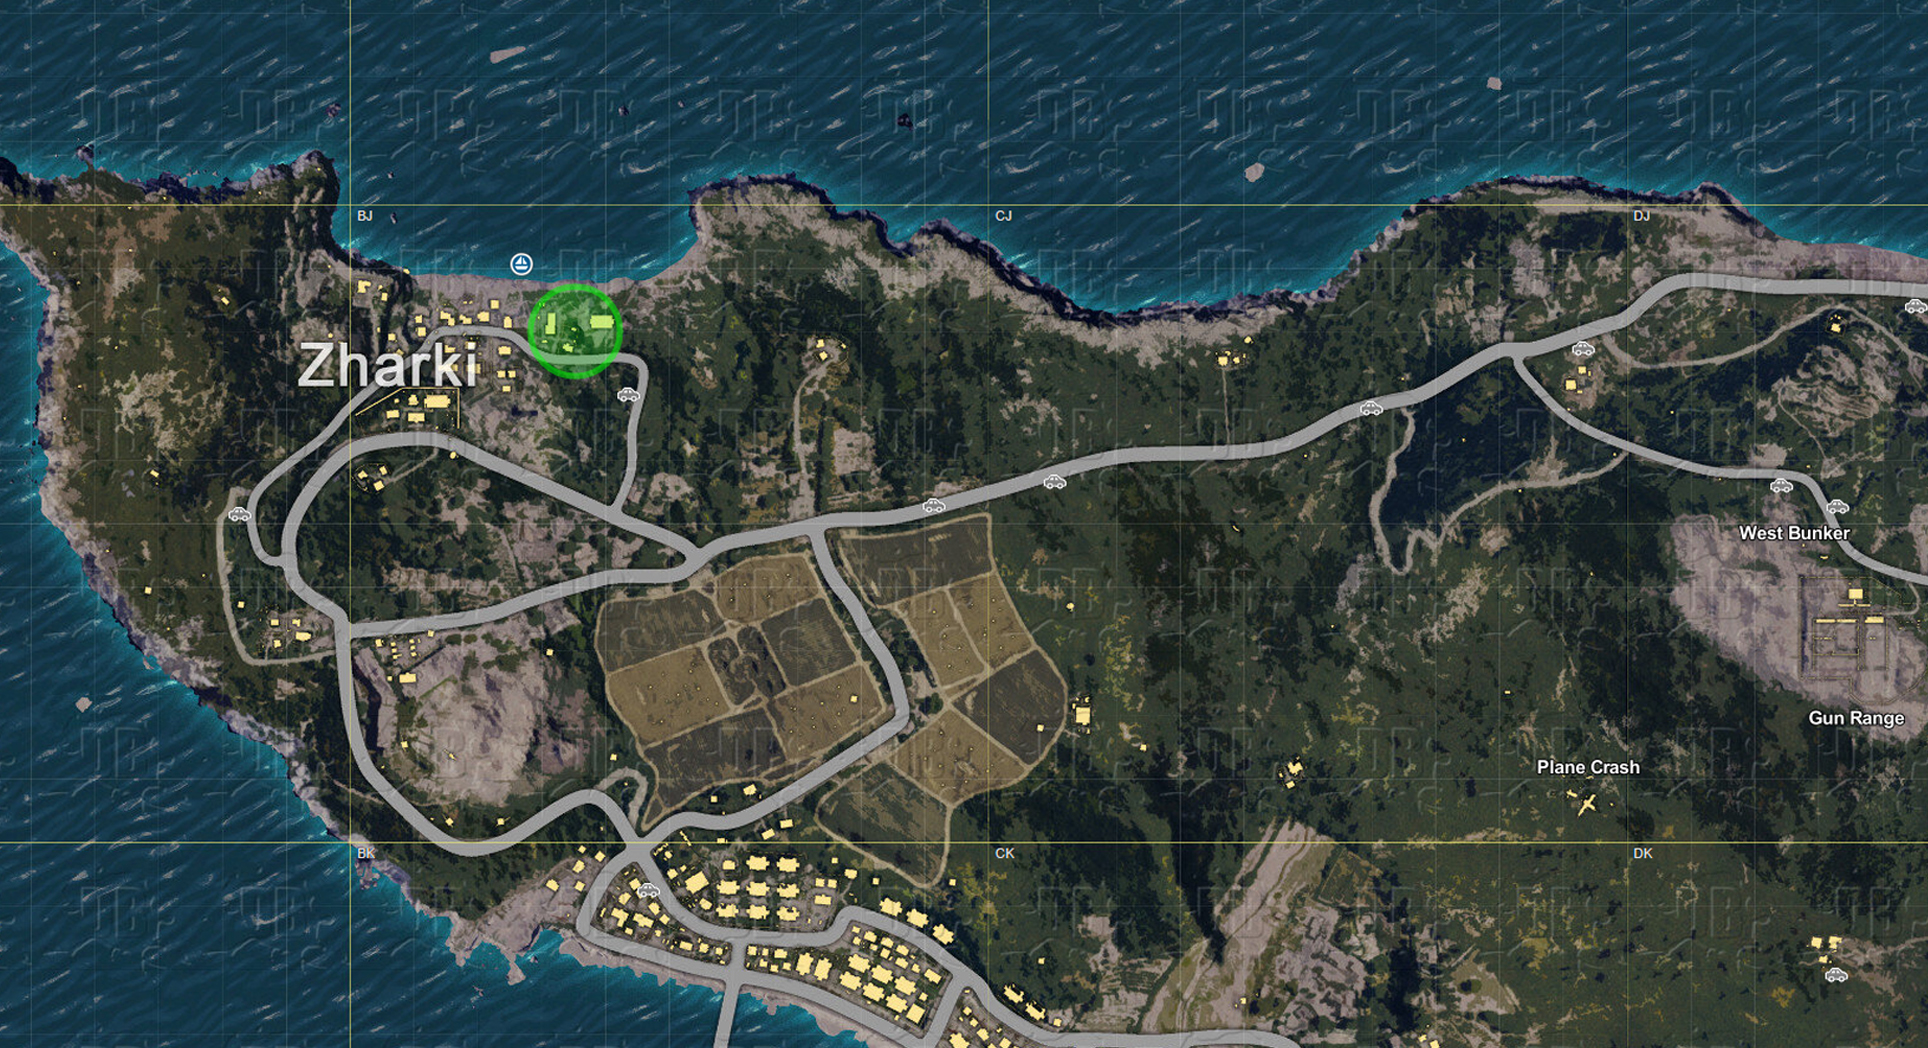
11. Zharki (B3:J2)
Unless the plane arrives from the northwest corner, Zharki’s large collection of houses almost always go untouched. Players rarely venture up here as it is so far away from the central body of the island. As such, this makes it the perfect drop zone if Zharki happens to be one of the last areas the plane passes over. You’re guaranteed to get yourself fully stocked with a decent amount of equipment in this town, and there are a handful of potential vehicle spawns nearby to help you get back into the fray. This is also a great area to stock up on resources if you plan on heading south towards the military gear spawns in Georgopol.

12. Northwest of Primorsk (A7:M8)
This collection of buildings sitting on the western coast of the island make very little impression to anyone checking out the map for potential drop zones, which is why it makes for the perfect destination if you get the chance. There’s a very high number of loot spawns in the vicinity and the surrounding buildings, and the chances for a vehicle to spawn in the north makes it the ideal early game dispenser of essentials. Many people tend to overlook this coastal front, instead opting to focus their attention on the town to the south instead, so it’s unlikely you’ll encounter much resistance here.

13. Northwest of Gatka of (B6:L3)
This small cluster of houses nestled at the foot of the nearby mountain only offers a small number of potential loot spawns, but it makes up for this by providing any daring players with a guaranteed vehicle spawn, affording you with the opportunity to race across the rest of the untouched land and access lucrative weapon spawns elsewhere before anyone else. Of course, doing this means you risk landing and not finding any useful weapons to begin with, but this gamble typically pays off if you’re tenacious enough to go looking in the right places.
Andy Moore is a gaming freelancer based in the UK. When he’s not writing, he can be found staring blankly out of the nearest window, or spending way too much time on Twitter.