It’s time for yet another zombie apocalypse as State of Decay 2 brings us more of those undead hordes we love so much. Fortunately, the micromanagement meat of the first game has come back too, and there are more random events and group conflicts than ever before. Whether you’re looking to get your hands dirty and take on the entire zombie race by yourself, or simply in the mood for some resource management against the backdrop of the collapse of society, we’ve got you covered with these handy tips and tricks to help you make the most of the apocalypse
Home sweet home
Because of the game’s sandbox format, once you’ve completed the handful of tutorial tasks at the start you’re left to your own devices. It’s not made clear that your first settlement doesn’t need to be your permanent residence. As you travel throughout each of the three areas—Cascade Hills, Meagher Valley and Drucker County—you’ll soon begin to uncover new compounds that can support your community, though not all home bases are built equal.
So what should you be looking for when it comes to setting down roots? Above all else, you’re going to want to find somewhere with as many small and large slots as possible. Since base slots can be converted into any number of utility and resource generating nodes in your camp, having a high number gives you some flexibility towards filling any gaps you may have in your community. For example, if you’ve got a high population and are in need of some extra food, you could help reduce the daily food cost by building a garden or farm to help reduce the drain on that resource. Some home bases will also come equipped with pre-installed facilities like extra beds, distilleries and water tanks, so make sure you take stock of what assets you already have before deciding what to do with your free slots.
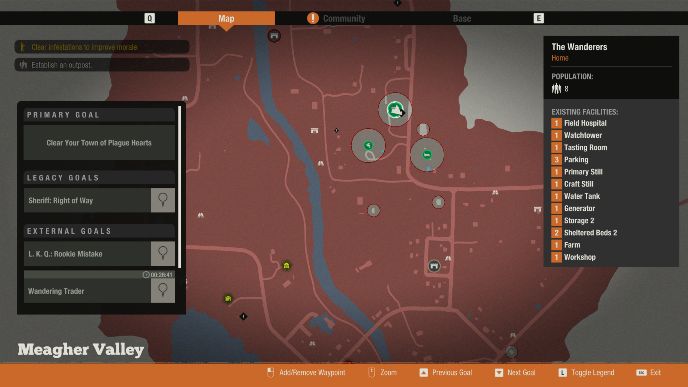
One of the best home bases I found during my time with the game was the distillery in the northeast of Meagher Valley. Not only does it sport five small slots (three inside, two outside) it also has two large slots, as well as two built-in distilleries which let you convert food into fuel, as well as an integrated water tower that lets you supply water to the entire compound. While the surrounding area isn’t nearly as built up and rich in resources as some of the other bases up for grabs, it does have easy access to several pockets of suburban sprawls, making resource runs fairly easy. The site also comes with its own built-in staging area, and providing you are willing to sacrifice one of those large slots, leaving this facility up after moving in will help to negate almost all of your base upkeep costs, minus food, allowing you some much needed breathing room to create a stockpile of goods.
If you’re unsure what facilities to build, there are a handful of options that are always a good choice in any situation. The most important building to have at any site is the infirmary as this is the only way to craft the blood plague cure, as well as a few other useful healing consumables that can help keep you topped up when out and about. If you’ve elected a character with the Sheriff legacy to be your leader then you should skip an infirmary in favor of the Field Hospital large slot facility if you have the space; this will also passively heal anyone resting in your base, which can help you save a huge amount on medicine costs. You will also want a workshop somewhere in your compound so that you can repair any damaged melee weapons you might have lying around. It’s also used to craft explosives like soda can grenades and Molotovs, which are a big help when trying to take down plague hearts.
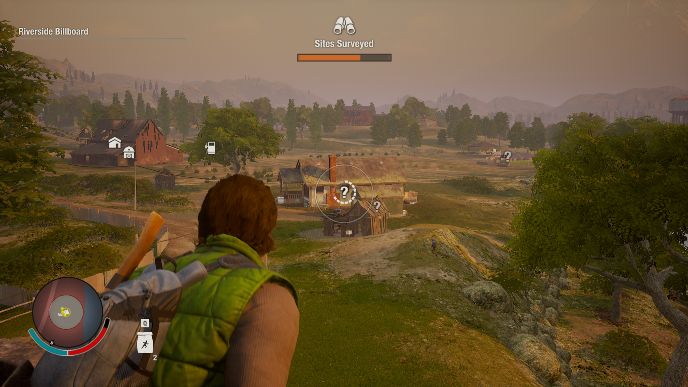
Whenever you start in either of the game’s three maps the entire zone will be uncharted. From the get go you can see the roads, building silhouettes, and general lay of the land, but it isn’t until you’ve properly scouted from one of the many observation towers that you truly know what’s out there. While it may not seem like a priority at first, it’s important to know that resources are finite within the game world, so mapping out what is available and what you’ll need to generate yourself is worthwhile in the long term. It doesn’t take long to fully map out the entire zone, but you would do well to get it done within the first couple of days as you will likely have too many side activities and resource runs demanding your attention after your base becomes a little more established.
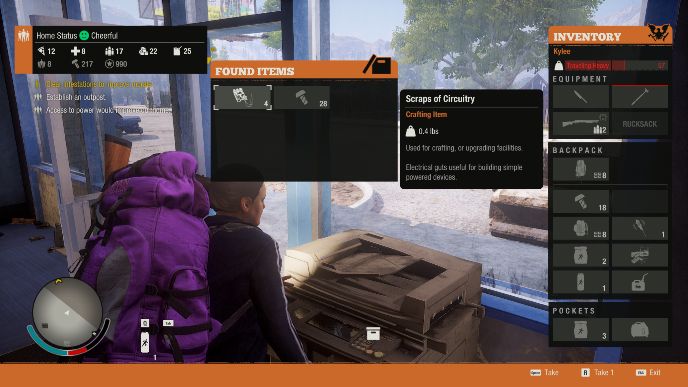
Where to find scraps of circuitry
After you’ve settled into your home base, one of the first things you should do is upgrade the command centre which comes pre-installed at every base. By upgrading this facility you will unlock extra outpost slots, which are a great way for you to outsource some of your resource generation needs to other buildings in the surrounding area, saving yourself valuable slots for your own home base in the process. While the first upgrade to the command centre only costs a few building materials, you’ll need an active power source, a survivor with the computer skill in your camp, and ten scraps of circuitry to upgrade the command centre to its highest tier. The first two prerequisites on that list aren’t too much hassle, but finding the ten scraps of circuitry can be much more difficult as they’re quite a scarce commodity.
To help improve your chances of finding these elusive resources, make sure to prioritize searching containers in offices, hardware stores, and laundromats as these tend to have a much higher spawn rate. Searching any nodes that look like old machinery in warehouses can also sometimes yield a handful of scraps, as well as any junction boxes that are searchable in nearby power substations.
Whenever you fight the hordes of undead in State of Decay 2 it always comes at a cost. Whether that’s in the form of stamina depletion and character exhaustion or weapon durability, you’re always paying a price per head. Fortunately there are ways that you can easily reduce these costs, allowing you to save your precious human and material assets for when things get tough.
First of all you should know that dodging allows you to pass through enemies, which is important given that it lets you line up a grapple on any zombie you can get behind. By grappling and performing a finisher on a zombie, you not only dispatch them in one hit, conserving your stamina, but you also do it with your pocket knife, meaning you don’t waste any weapon durability either. This is a great habit to get into when fighting against single targets or small groups, and it comes with the added bonus that your character is invulnerable during the execution animation. It may take some practice to lock down the cadence of the move, but once you can reliably dodge behind any offending undead, you’ll have a much easier and cost-effective time out in the wild.
After you’ve leveled up a survivor’s combat stat enough, you’ll be given the choice to specialize into one of two branching paths, which are determined by the passive traits each character has. These skill upgrades offer bonuses like decreased stamina cost when attacking, extra damage with specific weapons and increased health. You’ll also unlock a combat skill which can help manage hordes during combat, although some of these are more useful than others. I found that the shove skill you get from the ‘Close Combat’ tree worked quite well as it allowed you to instantly knock a zombie prone and had a fairly fast attack animation, whereas the grand slam attack from the ‘Striking’ tree was quite slow to use and would often get interrupted by an attacking zombie. What you choose here is a permanent upgrade for that character so make your choice wisely, but once you have chosen make sure you fully exploit the bonuses it gives you.
Bring a friend
Once you’ve built up your roster a bit, you should have a whole host of individuals just itching to get out into the wasteland and rummage through zombie bits for sweet, sweet resources. Thankfully the game lets you invite one lucky soul to accompany you on your merry jaunt through zombieland, and while you may be concerned that they’re going to end up as a zombie snack, the advantages of bringing a friend along for the ride heavily outweigh the risks involved.
Right off the bat, having another person with you when scavenging allows you some relative comfort that you can search in peace. While the AI isn’t the smartest tool in the shed, they do a decent enough job at keeping any nearby zeds at bay while you get down to business. It’s also worth noting that any weapons they are using will not consume any durability either, so letting them take care of zombies can be a great way to conserve your own weapons.
Your partner isn’t just a walking bodyguard, however. When inventory space starts to get a little tight, you can fully utilize your friend as the fully armed pack mule that they are. By talking to your partner out in the field, you can swap freely between them right then and there, while the person you swapped from then becomes your AI partner. This allows you to effectively double up on inventory space, where each character can store an entire backpack’s worth of goods, as well as carry a rucksack on their back, too. Be sure to remember to offload any valuable items from both characters when you return to your base, however, as they will retain these goods until you deposit them.
Ignore thy neighbor
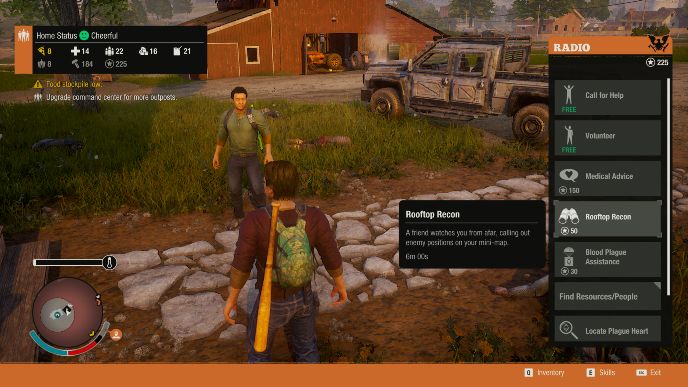
Sooner or later you’ll start to receive radio calls from nearby people in need of help. Sometimes these calls come from individuals, and sometimes they come from neighboring communities that want you to help them find specific resources or save one of their number from a sticky situation. While it may be tempting to help out your fellow neighbors, it is almost always done so at the cost of your own group. Not only could you use that time to find your own township some much needed resources, but the rewards you get for completing these tasks for your neighbors are fairly useless. From minor supply drops to temporary reconnaissance that reveals enemies on your radar for a short while, the neighbor bonuses are mostly forgettable. You also need to pay for them with influence, which only serves to compound their useless benefits in favor of something more productive.
If you do decide to start sweet talking nearby settlements, be aware that they will regularly call on you to help them out with supplies and other tasks. If you don’t get around to lending a hand in a reasonable time frame, you run the risk of having them leave the area for good, essentially undoing all of your diplomatic hand work in the process.
Andy Moore is a gaming freelancer based in the UK. When he’s not writing, he can be found staring blankly out of the nearest window, or spending way too much time on Twitter.