Xenoblade Chronicles 2’s vast titan-striding worlds might be a sightseer’s paradise, but there are plenty of pitfalls and obtuse mechanics hiding just under the surface waiting to trip up even the most experienced salvager. Whether it’s the death of your Drivers or confusion about core crystals, we’ve got you covered with some handy tips and tricks to make your time on Alrest a little bit easier.
Affinity is the key (to success)
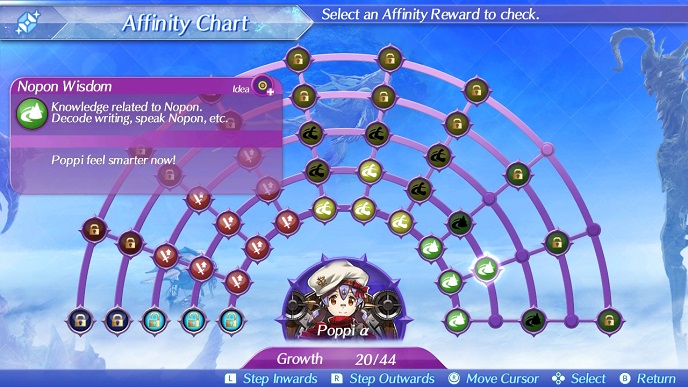
Each Blade, regardless of whether they’re common or rare, will come equipped with their own personalized affinity chart. Spread out across a half circle, this series of connected lines and nodes creates the template for you to monitor and upgrade the abilities of each individual blade. Whilst it’s easy to overlook at the seemingly minor bumps in areas like crit chance and health gained from potions, it’s important to understand that chasing after these nodes is vital to making sure your Blades are able to keep up with their respective roles, both in and out of combat. Even minor changes to a Blade’s stats can make a noticeable difference in combat, sometimes even turning a tough encounter into something more palatable. Fortunately, each node clearly shows you what prerequisites you need to meet before the upgrade is unlocked, so it’s worthwhile heading into the screen regularly to make sure you’re checking off these boxes as you progress through the game.
Most of the upgrades can be unlocked by completing a specific action in combat or by reaching a certain milestone like walking 80,000 steps, but there are a handful of nodes that are unlocked by equipping the right items in your Driver’s pouch. Typically linked to the field skills, these upgrades are often used to help you gather useful materials, access locked areas, and obtain hidden loot from otherwise inaccessible chests. These affinity nodes can be unlocked almost immediately once you gain access to them on the tree, simply by equipping the appropriate item into the Driver’s pouch several times in succession. For example, Poppi’s level 2 super strength field skill requires you to use staple food in Tora’s pouch a total of four times, so if you were to repeatedly slot staple goods into Tora’s pouch one after another, you would lose out on the passive buffs each item gives you, but the node criteria would be fulfilled and you will have unlocked the next tier of the skill.
With a seemingly endless supply of different Blades to unlock and equip, it can be a little daunting trying to decide the best course of action when it comes to using up those Core Crystals. Since Blades are bound to the Driver that use their Core Cyrstal, and given that the process of unlocking a Blade is almost entirely left up to chance, you may find that the first few Blades you obtain serve little or no purpose on their respective owners. Not all Blades are created equal, however, and each core crystal, regardless of whether it’s a common, rare, or legendary type, has a chance at spawning one of the unique rare Blades. These special Blaes are always better than the generic common Blades as they always come with a full affinity chart to level up, and can sometimes bring unique field skills and abilities into the mix too.
Since the process is almost entirely left to chance, there’s a good chance a suitable rare Blade will end up bonding with a Driver that isn’t the right fit for them. If this happens, you can use a rare consumable item called an Overdrive Protocol to reassign them to a Driver that suits their role in the party. Due to the rarity and finite nature of these consumables, it’s a good idea to use these sparingly, and only then exclusively on moving rare Blades where necessary. You can find a single Overdrive Protocol inside the chest behind the Driver recruiters in Torigoth in chapter 2, inside a chest next to Hamish in Garfont Village in chapter 3, and inside a chest in the upstairs hot springs of the inn in Mor Ardain during chapter 4.
Don’t worry too much about gathering up an excess of random common Blades, either, as these can be put to use in merc missions, which unlocks during chapter 4, and it’s useful to have a wide variety of Blades to make sure you can maximize your profits when sending Blades out on missions.
Gain the upper hand with classes
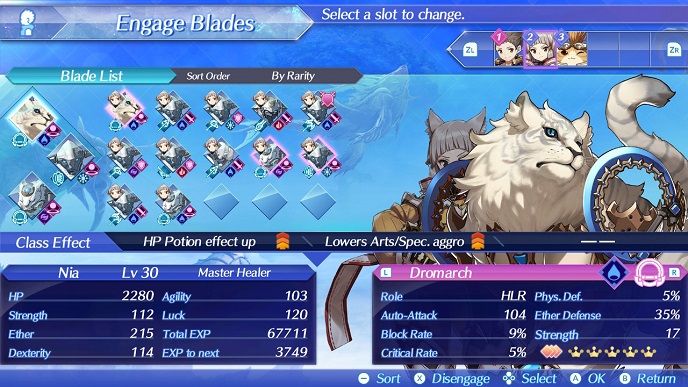
With so many Blades to choose from it can be difficult trying to decide who to take into battle. While finding Blades that work for you is important, you can actually get some extra passive bonuses depending on the roles of the Blades you equip. These bonuses come in the form of classes, and are determined based on the composition of each Driver’s Blade loadout. These classes can become quite varied once you unlock the ability to bring three Blades along at once, and some clever reshuffling on each Driver’s Blade loadout can help you reinforce the roles each of your Drivers are filling, whether that’s doing more damage as an attacker, healing more and drawing less aggro as a healer, or just soaking more damage as a tank.
The classes extend beyond the three main roles, however, so it’s worthwhile experimenting with your composition to see what you get. For example, if you’re finding that your main damage dealer is drawing too much aggro away from the tank, you could try making them the Wild Cavalier class, which requires a Driver to equip two attack Blades and a healer Blade, giving them a bonus to attack while reducing the aggro they generate with arts and specials. Make sure you play around with the Blades at your disposal until you find the classes that work best for you.
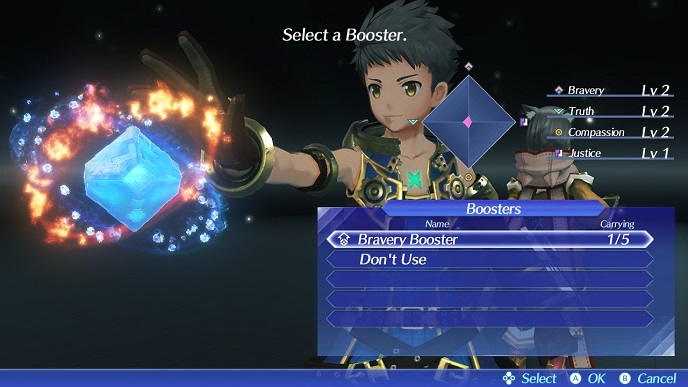
Perhaps the most obscure system at work in Xenoblade Chronicles 2, the booster system is framed as a way for you to gain a degree of control over the randomized nature of drawing a Blade from a core crystal. By cranking up the value of one of the four booster categories you can, in theory, increase the chances of drawing a Blade with a particular element type. The booster categories and elemental attunements are:
Bravery—Fire and Water. Truth—Wind and Ice Compassion—Electric and Earth Justice—Light and Dark
With twenty or so unique rare Blades obtainable exclusively by finding them in regular core crystals, it’s possible to lean on the booster system to help you isolate the Blade that you’re after. For example, if I wanted to try and specifically get Perceval, a Dark type tank, on one of my Drivers, I would crank up the Justice stat with boosters to try and increase the chances that the Blade obtained is from the Light or Dark category. It’s worth noting however that using boosters does not guarantee that you will draw a Blade from the element you’ve boosted. During my experiments with the system I have found that the chance to get the desired element does increase noticeably, but your mileage may vary.
Boosters can be obtained by either releasing Blades, which permanently removes them from your party, or by completing specific salvage orders at the collectors in the towns. While it may seem like releasing unused Blades is the easier option, you’ll actually earn more boosters from completing the salvage orders, leaving your spare Blades free to go on merc missions that can earn you rewards elsewhere.
Deeds, dev levels and you
After spending a bit of time on the first titan, you and your merry band will eventually be offered a side quest that involves purchasing the deed to a nearby produce stall, introducing young Rex and his cohorts to the world of ruthless business practices. While the game briefly walks you through the basics of hostile takeovers, it fails to mention just how valuable some of the passive bonuses you get from purchasing deeds can be to you and your group as you explore Alrest. From increases to item collection range to permanent boosts to your item discovery rate and gold dropped in battle, these secondary perks can quickly stack odds in your favor so they are worth seeking out whenever you get the chance.
There’s a catch, however, in that most stores won’t actually sell you their full range of goods until you’ve pumped enough time, effort and cash into the economy of the town. This is where each town’s development, or “Dev level,” comes into play. As the Dev level increases, not only will stores begin to offer you discounts, but you will also start to see newer items appear in some shops. Completing side quests in the area, spending cash inside local shops, and talking to NPCs with stars next to their name will all contribute towards the Dev level in some way, so be sure to explore and revisit towns regularly. Regardless of the Dev level, some shops will continue to withhold their goods until you complete specific merc missions for them, so it’s worthwhile focusing on these missions when you gain access to the merc system in chapter 4.
Andy Moore is a gaming freelancer based in the UK. When he’s not writing, he can be found staring blankly out of the nearest window, or spending way too much time on Twitter.