
A very wise person on Twitter recently said that videogames should come with an “adult with busy lives mode,” something to remind you of the controls if you haven’t played in a while. It’s one of the best ideas I’ve ever heard. I can’t imagine how many games I’d have gotten back into if I didn’t have to spend the first 20 minutes or so relearning how to play them.
This is of course especially relevant with Destiny 2. Bungie’s shooter has gotten a new lease on life two years after its release, with a new expansion, a new free-to-play version, and the addition of cross-save, and players like myself are returning to the game for the first time in months. If you’re anything like me, a quick rundown of the basics is imperative. A few of the game’s key features don’t follow convention and you’ll need to feel confident in using them before you get into battle, not during. Here’s a checklist you can run through to get reacquainted with the essentials, so you’re not taken by surprise as you throw yourself back into the game.
5. Stop everything and get reacquainted with the Director
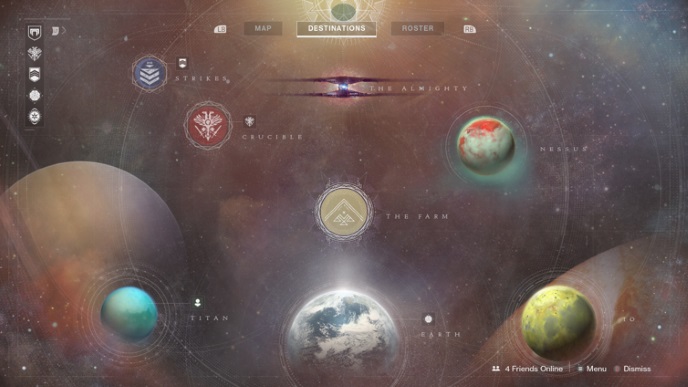
Destiny 2 has a tendency to just throw everything at you without a lot of warm-up time. Coming back to the game can be disorienting if you don’t remember what is located where. For that reason, you should just take a moment to fiddle around in the menu and figure things out before dumping yourself back into the action. From the screen where you load your character, once you select who you’d like to play as, you will be put into the Director menu. There are several tabs along the top, labeled Store, Quests, Map, Destinations, Roster, and Seasons. Quests is where you’ll set your objective. Destinations will show you the entire planet system and the planets you can travel to, with markers of any of your tracked objectives located there. Map will give you the local map of your location, and provide fast travel icons to certain areas and quests. Some quests, like Strikes, can only be started by traveling to their icon on the map, while others are only obtained directly from NPCs; be sure to keep an eye out for both, and be aware that fast traveling to a Strike location will automatically start the matchmaking process.
Also, note that many quests do not have regular objective markers unless you summon your Ghost and use Navigation mode. To do so, tap the button used to open the Director menu (as opposed to holding it). This will highlight any key items that need to be interacted with during the quest. You can also use this button to summon your vehicle.
4. Find a quiet spot and organize your inventory
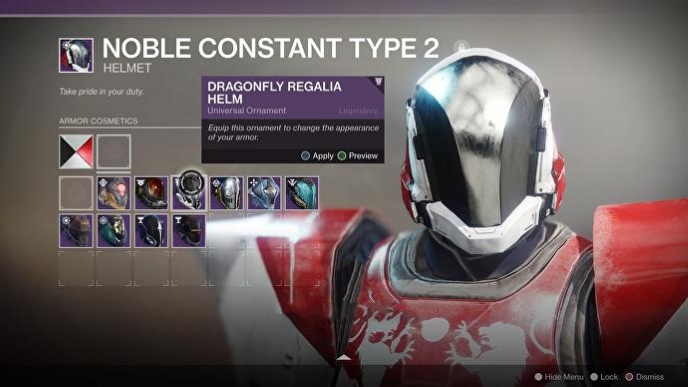
The second thing you’ll want to do is head to a safe player hub where you can just sit for a second and figure everything out. The Tower is available, but I prefer The Farm, a section of the European Dead Zone on Earth, since it’s a bit smaller and quieter. The way to travel to your destination will be in your Director menu (to get there, press Touch Pad on PlayStation 4, View on Xbox One, or M on PC). Once you arrive, open your inventory (Options button on PlayStation 4, Menu on Xbox One, and i on PC) and take a look at your equipment loadout. Make sure you have three guns equipped in all three slots and compare the stats of each piece of armor and weaponry to make sure you have the strongest ones. Clicking on each will also allow you to change their skin but more importantly take a look at their mods, which will give insight into the weapon’s advantages and inform you how to best use them.
3. Check out the control scheme and rebind your keys
Your Guardian has a few different special attacks and trying to remember how to implement them in mid-battle is a nightmare, especially if you’ve just switched platforms. While in a safe location, open up Settings and check out how the keys are mapped, at least so you know how to implement a Super attack and throw a grenade. Most of the controls are conventional and easy to pick up, but a few of the most essential are also the least obvious. PC users, for example, may be surprised to find that Q is used for grenades, not G, which is instead mapped to finishing attacks.
2. Go test your guns and maneuvering skills
There isn’t a testing range for you to try out your weapons until the game is completed, so if you want to get familiar with the guns in your inventory, you’ll need to find a reasonably quiet place to test a few things out. A few suggested spots include lost sectors like The Orrery, in the area north of the Artifact’s Edge spawn point in Nessus. There’s also Widow’s Walk in Trostland in the European Dead Zone on Earth, and Core Terminus in Braytech Futurescape on Mars. While you’re there, take some time to get familiar with some of the game’s other mechanics too, like sliding and landing precision hits. You’ll also want to test out the gravity and experiment with jumping and drifting (as gravity is “normal” in safe zone locations). While the ability to semi-float is helpful for many reasons, if you don’t get the timing just right, you absolutely will fall and die. Figure out the drift’s limits and how many seconds you have in the air.
1. Check your subclass and adjust for synergized playstyle
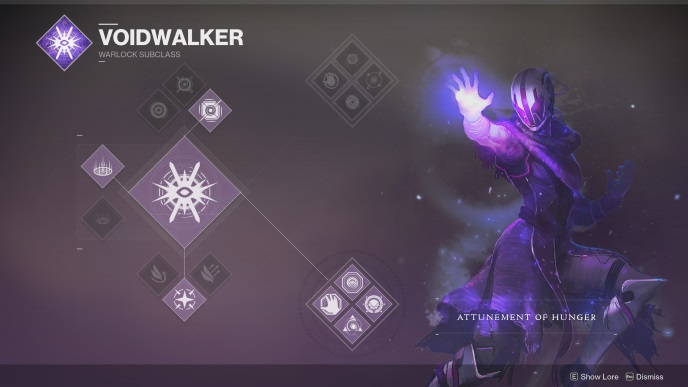
A big part of the Destiny 2 experience is the Guardian’s three classes and their subclasses, each of which put a slightly different spin on your character’s abilities depending on your preferences, not only in terms of playstyle but also elemental effect—Solar, Arc, or Void. Depending on how they are configured, you can cater to certain strengths in their attacks. For example, the Code of Commander arc for Sentinel, if synergized properly, can be used to cause chain explosions that heal you and your teammates. To get reacquainted with your chosen subclass and the abilities unlocked and selected for your character, click the icon in your inventory (at the top of the left-hand side). From there you can scan over each, read the description and decide if each special attack still suits your playstyle, as well as check what keys they’re mapped to.
This is of course only a start, and many of the game’s nuances can only be understood over time. If you’re a Destiny 2 beginner or need more information than this guide can provide, check out the Getting Started guide provided by Bungie over at their official site.
Holly Green is the assistant editor of Paste Games and a reporter and semiprofessional photographer. She is also the author of Fry Scores: An Unofficial Guide To Video Game Grub. You can find her work at Gamasutra, Polygon, Unwinnable, and other videogame news publications.