I’m not only an editor and a writer here at Paste. I’m also a deeply failed musician who’s been playing in the same band since before Clinton was impeached. (We’re on Spotify and Bandcamp, if you really want to humor me.) Although it’s never been a job, making music has been a big part of my life since I was a teenager, so as soon as I first caught a glimpse of the Nintendo Labo piano, I knew I was going to have to get the thing. And now I have. And here’s what I think about it. Alright!
The first thing I realized about the Labo piano is that it takes a really long time to put together. It’s the only Labo toy I’ve assembled, and I’m pretty sure it’s the most complicated one in the Labo Variety Kit; the software recommends that you save it for last, like it’s the big boss of the whole thing. I can see why now—it took me about four hours in total to finish it up. There are about eight different cardboard pages that you have to punch components out of, and these pages aren’t small—if they were placemats at a restaurant they’d be about the biggest placemats I’ve ever seen. Building it is a six step process where you have to carefully push dozens of pieces out of those cardboard sheets, crease and fold them in multiple spots per piece, and then delicately fit tabs through a multitude of slots in order to keep everything in place. Each of those six steps will take at least a half hour, as you build the piano part by part. You’ll start with the body, then the keyboard, then the individual keys (one octave’s worth, 13 keys from C to C), then the various little knobs, switches and makeshift mechanisms used to adjust the sound of the keyboard. The software holds your hand through every step, only progressing when you hold down a button on the Switch to fast forward to the next step. It’s time consuming, but incredibly easy and clearly detailed in exacting fashion on the Switch’s screen—as a longtime veteran of assembling Ikea furniture I now wish Nintendo would go ahead and start making those instructions, too.
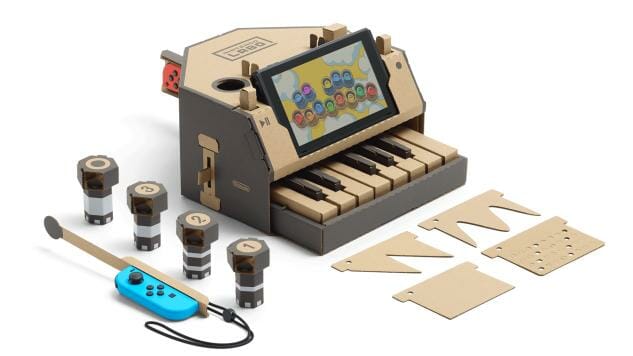
If you’re wondering how this weird piano keyboard works, well, I was too, until last night. It basically comes down to reflective tape and the infared sensor on the Switch’s Joy-Con controllers. To play the keyboard you have to stick the right Joy-Con into a slot at the back of the whole contraption, with its IR sensor facing inward. Every key and knob that impacts the sound has a sticker that you have to affix in the right location. (Those instructions will walk you through every step, so don’t worry about forgetting to use those stickers or putting them in the wrong place.) The IR camera can tell which key is being played by reading that strip of tape and converting it into sound. Each white key has a piece of cardboard jutting out of its end that acts like a spring—as you press down on the key, that back end raises up to touch the bottom of the keyboard tray, and then that springy cardboard tab pushes it back down again once you pick up your finger. The interval keys simply balance on a tab inside the tray. That’s not ideal—they don’t really snap into place, so those black keys are loose and prone to leaning over or slipping out of position. Still, considering it’s entirely cardboard, the keys have more substance and response to them than I’d ever expect. I’ve noticed just the slightest bit of delay when playing them—literally milliseconds—but if you’ve ever tried playing along to something you probably realize that even that minute bit of time can make it hard to sync up properly. That might limit its usefulness as a synthesizer for pro-am recording, but overall this is an amazing little piece of work, from a technical perspective.
After the piano is fully built, there’s a spot in the front to slide the Switch’s screen. It’s like the music holder on a piano, only it’s for a tablet that uses software to create the sounds you’re trying to play. The base piano mode is pretty much what I expected from this thing: a toy piano with one tone and a single octave, with on-screen keys that look like little frogs. It’s cute and functional as a toy but doesn’t really have any other uses; if that was all the Labo piano did I would’ve felt like the long construction time was a waste.
Thankfully there’s also studio mode. Studio mode is great.
Studio mode is where all the ancillary pieces of cardboard come into play, and the full range and surprising depth of the Labo piano reveals itself. Studio mode is where the 13 keys on the piano are expanded into a five octave range. There’s a switch on the left of the piano body, and when you tap it up or down the piano changes octaves, even in the middle of a note. Studio mode is where the four “special” knobs are used for a variety of purposes. One knob adjusts the volume, a second modifies the envelope (which determines how quickly a note begins or ends when it’s played), a third will coat every note in reverb, and the fourth opens up a special mode that I’ll talk about in a little bit. And although I keep using the word “note” to refer to the sounds the Labo makes, don’t worry—you can totally play chords on this thing. It’s not monophonic. There are even waveform cards you can slide into a slot on the top of the piano to adjust the waveform of the synthesizer’s output, adjusting the tone and timbre in various unusual ways. And if you couldn’t tell by the name, studio mode is also where you can record and play back your own compositions, with built in drum machine or metronome helping you keep time.
That fourth knob lets the Labo piano do something completely weird and unexpected. The left Joy-Con can be used as a baton to basically “conduct” music through Studio mode. It also, though, interfaces with that fourth knob to facilitate something called Acoustic mode. When that fourth knob is in place it redirects the audio output to the speaker in that left Joy-Con. It has a harsh buzzing tone to it when it’s simply played through that speaker. If you put the Joy-Con on top of an empty box, though, you suddenly have an impromptu amplifier. The vibrations from that Joy-Con rumble into the box, which is then amplified by all that open space. The knob lets you adjust the level split between the Switch speakers and the Joy-Con’s speaker. It can be hard to get a good tone in Acoustic mode—the Joy-Con’s buzzing has a strong egg timer feel to it—but when it’s optimized it results in a cleaner, warmer, less synthetic sound than possible with the Switch’s speakers.
I didn’t expect any of that. Okay, I figured there’d be a way to record music on here, but I didn’t even think this thing would work as a polyphonic synthesizer. I basically expected what that original mode resembles, a glorified toy piano not much more sophisticated than something Fisher-Price would make. Instead it’s a fairly robust synthesizer package that I could absolutely see myself using on future recording projects. It would never replace my regular organ (an Acetone Phenix Top-3 from 1965, which gets this gloriously warm and fuzzy tone that sounds like every great ‘60s garage band), or any of the fancy Moogs and synthesizers my bandmates own, but it’s a surprisingly versatile little tool all the same.
I haven’t been able to try out any of the other Variety Kit toys or the Robot Kit yet. I also haven’t had a chance to record anything of substance with the piano. I did whip up a couple of short videos that show off some of its features, and you can see those below. Without having even played the rest of the Variety Kit, I feel pretty comfortable saying that, if you play music, own a Switch and are looking for a relatively cheap synthesizer, or if you want to learn how to play piano, there’s no reason not to pick this thing up. Even if it does take a full afternoon to put together.
— Garrett Martin (@grmartin) May 3, 2018
another Labo test pic.twitter.com/b7kggXfJ8H
— Garrett Martin (@grmartin) May 3, 2018
Garrett Martin edits Paste’s comedy and games sections. He’s on Twitter @grmartin. The band he’s in, Je Suis France, has put out like 20 records since 2000. Some of them are listenable.