
With eight different tales to tell, Octopath Traveler can seem like a sprawling web of difficult choices and unanswered questions, especially when starting out. There are a whole bunch of different options available to choose from, but making the right choice isn’t always as obvious as you might think. With it’s semi-open world spreading out in every direction, it’s easy to get turned around and lost, and if you’re not careful you can quickly find yourself struggling to fight back the endless encounters and punishing bosses that litter the landscape. Fortunately we’ve pulled together eight different tips and tricks to help you on your way as you travel across Orsterra.
1. Job locations
As you wrap up the starting areas for each of your chosen party members, you’ll soon find yourself on the road towards any number of chapter two destinations. Regardless of which direction you travel, there’s a good chance you’ll end up walking past one of a number of job shrines scattered across the game world. By activating these altars, you unlock the ability to equip a subjob on your party members, essentially opening up a whole other class skill tree for your characters to utilize alongside their primary role. While having a secondary job isn’t that important throughout the rest of chapter two, the enemies in the areas beyond will start to require increasingly more difficult approaches, and that’s where the versatility of a secondary job becomes essential.
To find the shrines head towards the locations listed below and be sure to watch your radar. When you enter the area containing a shrine, a small pillar-like icon will appear, leading you directly towards the shrine’s entrance. There is no requirement to obtain any of the regular eight jobs, but in order to access the four extra advanced jobs you will need to defeat a difficult boss.
The primary jobs are located in the following areas:
Warrior – North Stoneguard Pass
Dancer – Northern Wellspring Sands
Apothecary – East Saintsbridge Traverse
Thief – South Quarrycrest Pass
Hunter – East Victor’s Hollow Trail
Cleric – Western Stillsnow Wilds
Scholar – Western Noblecourt Flats
Merchant – Moonstruck Coast
The advanced jobs are located in the following areas:
Runelord – West Everhold Pass
Warmaster – North Riverford Traverse
Sorcerer – East Duskbarrow Trail
Starseer – Western Wispermill Flats
2. Breaking Enemies
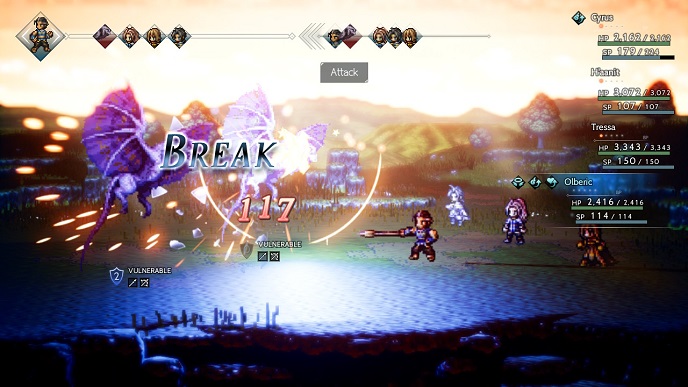
Combat in Octopath Traveler centers around a handful of fairly simple combat mechanics, the most important being combat breaks. Breaking an enemy causes them to not only skip a turn, but also opens them up to take increased damage for the duration they are considered broken. In order to break an enemy, you must land an attack with a relevant weakness until their break shield has been depleted. The main obstacle when breaking enemies, especially when fighting foes you’ve never encountered before, is figuring out what their weaknesses are in the first place since they remain hidden until you first exploit them. Anyone that takes Cyrus into their party has a small advantage here given that his combat ability allows him to automatically analyze every enemy at the start of the fight and discover one weakness for each enemy type present.
Whether or not you’re packing the resident scholar, figuring out what the weaknesses are can be quite easy once you understand that the order of the icons underneath each enemy follows a set pattern. So long as you’ve got at least one weakness revealed, you can narrow down the remaining attack types to give yourself a better shot of filling in the gaps as you fight. The order of weaknesses will always follow this pattern:
Swords > Spears > Daggers > Axes > Bows > Staves > Fire > Ice > Lightning > Wind > Holy > Dark
What this means is that if, for example, you’re fighting an enemy that has three weaknesses and the middle box has already been revealed to be a weakness to spear attacks, then logically the only thing that could fill the unrevealed box to the left of it would be a weakness to sword attacks. By utilizing this flow chart of weaknesses, you’ll soon find yourself much more capable at piecing together any unknown enemy weaknesses without too much trouble.
3. Making Money
As in most JRPGs, having a decent wad of cash on hand makes life easier, as it can help you stock up on essential consumables and gear that will ultimately help make your journey run a little smoother. Octopath Traveler is no exception, but it can be a little difficult to amass your own private fortune if your current team is a little underleveled or not self-sustainable. Now you could spend ages continuously farming random encounters to try and build up your coffers, but there are a number of things you can do to help you passively pinch pennies, and with a little thriftiness here and there, you’ll be building your own fortune in no time.
To get started on your quest for wealth, you’re going to want to find some room for the resident Merchant Tressa in your current roster. The reason you want Tressa in your team is because one of her passive abilities allows her to collect money whenever she enters a new zone. As you journey across Orsterra you’ll be doing a lot of walking, so it makes sense to gather coins as you go. The amount of money gathered depends on the distance traveled in the zone you left as well as the difficulty rating, with higher level areas offering substantially more money, to the point where you can can often total 2000-3000 coins per collection. If you’re really starved for cash, you can game this system a little by finding one of the higher level zones near the chapter two and three areas and run around them using the scholar passives Evasive Maneuvers and Percipience, as well as the cleric passive Evil Ward; when combined, they allow you to travel long distances without getting an encounter, as well as preventing you from being surprised by enemies and allowing you to flee from battles much easier. This method does work, but it’s a little time consuming for the minor payoff—a payoff that, in theory, you should be getting anyway simply by working on the main and side quests.
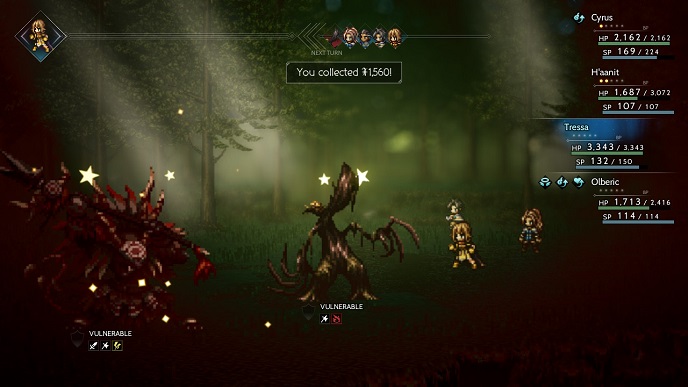
The other main money making move you will want to remember is to utilize the Merchant skill Collect. If you’re following the previous tip, you should already have a merchant in the party, so whenever an enemy is getting low on health and is broken, try to make it a habit of using Collect to net yourself a tidy sum. You can augment this as well by having your Merchant equip the Thief passive Snatch, which doubles the money collected. It’s easy to write off Collect at the start of the game as the money it produces is minimal at best, but as soon as you start to hit the level 30+ areas you should be easily obtaining about 1500 to 3000 per enemy, which soon adds up. You should always make sure to use Collect whenever you’re fighting a boss as well, as these special enemies can offer much bigger stipends depending on their difficulty, with some offering anything from 40000 to 80000 coins when you collect from them.
4. Stats, Gear and Magic Nuts
If you’re having trouble defeating enemies that sit within your suggested level range, it might be because your gear isn’t up to scratch. Things move quite fast in the two chapters of Octopath Traveler, and it’s easy to outlevel your gear without noticing. To help fix this, you should always make sure to check out the weapon shop whenever you enter a new town as you can usually find something that is an upgrade for one of your party. Be sure to check the town out fully for any openable chests as these usually contain either money or expensive consumables. If you’re travelling with Therion it’s always recommended that you thoroughly check out all the town NPCs before buying anything, as you can usually find items of equal or better quality in the pockets of the locals.
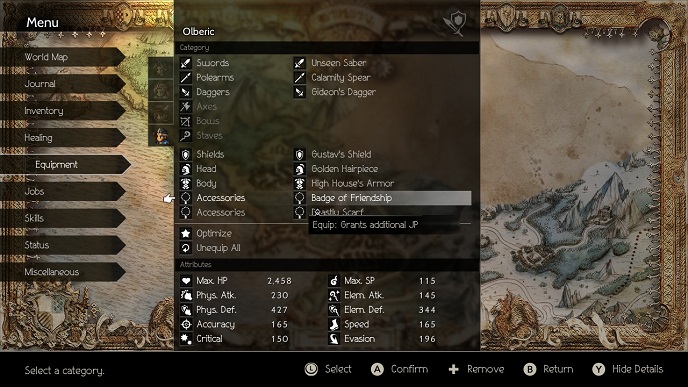
When choosing what weapons to put your your team of four, there are a few things you should consider that the game doesn’t always make immediately obvious. For starters, stacking high physical and elemental damage weapons won’t give you a cumulative bonus to attack damage on that character. Instead, attacks will specifically pull a single value from their respective attributes. For example, if you had a Scholar with the Dancer job and you gave them a staff with 100 elemental attack and a dagger with 50 elemental attack, any elemental spells you cast will only factor in the 100 from the staff and ignore the other 50 from the dagger. When it comes to physical attacks and skills, the damage values are taken directly from the weapon being used, so if you equip a low physical damage sword and a high physical damage spear, your sword attacks won’t factor in the higher bonus from your spear and vice versa. It’s also worth noting that If you are planning on making one of your party a dedicated healer, you should be aware that the potency of healing is directly linked to the elemental defense stat, with higher numbers resulting in considerably more powerful heals.
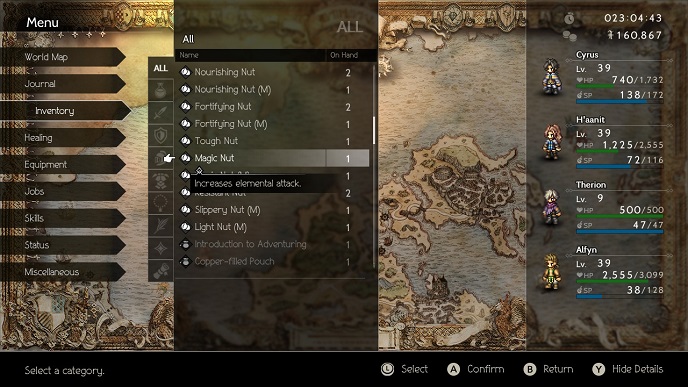
You will eventually come across a number of magical nuts as you journey across Orsterra, and while they might seem fairly inert and forgettable to begin with, these consumables can be a great way to boost specific party member stats permanently. Each of your character’s stats has a corresponding nut boost out there, and they come in different strengths too ranging from minor to major upgrades. Choose wisely however, as there’s only a finite number of nuts available to find in the game world.
5. Stretching SP Further

Sooner or later you’re going to start noticing that some of your party members, especially those that are dedicated spellcasters, are often running low on SP. As you climb levels and eventually explore some of the advanced jobs, the drain on SP pools will become much more substantial, so learning how to make your SP use efficient can make things go a lot smoother in the long run.
For starters, you are going to want to unlock the fourth Merchant passive SP Saver on any of your party members that are particularly SP intensive. By equipping this passive, you immediately halve the SP cost of any spells cast, which can be a huge bonus when you’re regularly casting spells that usually cost upwards of 20 to 30 SP each time. You can combine this with the third Dancer passive Second Wind, which restores a small amount of SP at the end of that character’s turn. When you combine these two passives together you can come very close to having the entire spell cost refunded back to you, making it an ideal setup for sustaining your SP pool during long drawn out encounters.
If you want to go even further with your SP efficiency then you need to obtain the Dragon’s Scarf, an equippable accessory that gives the user SP back at the end of their turn, much like the Dancer passive Second Wind. The scarf can be found on Tressa’s mother Marina in Rippletide (after you’ve completed Tressa’s initial chapter 1 quest) and can be purchased for a fairly modest sum using Tressa’s Purchase path action. While you’re here you should also purchase the Beastly Scarf from Tressa’s father too as it does the exact same thing but for HP instead of SP.
6. Leveling Between Chapters
Once you’ve finished up the majority of the chapter two segments, you may find yourself somewhat underleveled for the jump to chapter three and at a loss on how to work your way through those missing levels. It’s here that Octopath Traveler shows some of its cracks, as the process of grinding up between chapters can be a little bit tedious, especially when you have to do it multiple times if you’re trying to complete all eight character stories. Thankfully there are a handful of areas that are ripe for easy farming. With large experience rewards and easily breakable enemies, these areas make for the opportune place to spend a bit of time grinding up your party members, and their ease of access and proximity to major settlements for quicker recovery and consumable top ups makes these farming spots ideal.
Here’s where you should go when you are stuck in the following level ranges:
Level 20-30: Inside the Tomb of the King on the path to stoneguard.
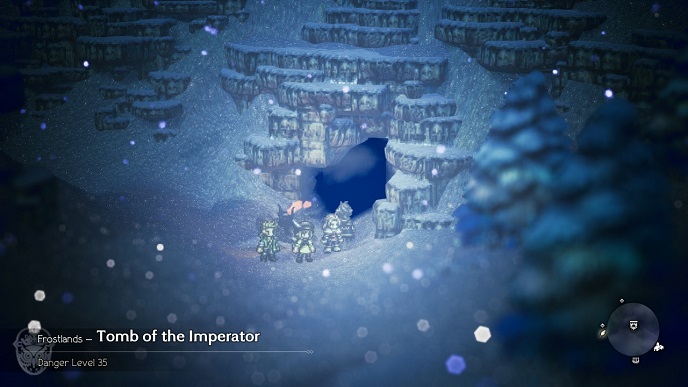
Level 30-35: Inside the Tomb of the Imperator near Stillsnow. The ideal enemy here is the cluster of bats.
Level 40+: North Riverford Traverse, just outside Riverford. The insect swarms are easily broken with AOE ice attacks.
Of course, there are plenty of other areas you can head to if you’re looking to score a bit of extra experience. If you want to tackle some of the sidequests while you level there are a number of them located in and near some of the chapter two and three settlements that, once acquired, cause a mini boss to spawn in some of the nearby instanced areas. These fights can vary wildly from being easy to extremely difficult however, so only tackle these if you’re confident you can take on the enemies without much trouble.
7. Exploiting Bewildering Grace
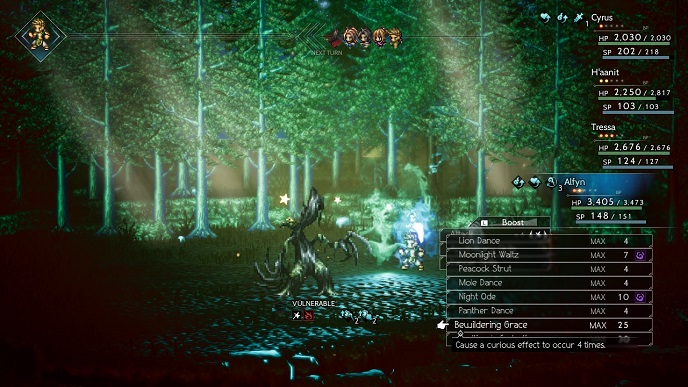
If you’re looking to rapidly increase your experience gain then there is another way other than straight up farming out the levels you’re after. Located inconspicuously among the Dancer’s moveset is a skill called Bewildering Grace. When cast, Bewildering Grace will cause any number of effects to happen, dependent on how many BP you spent when you cast the skill. These effects can vary wildly, and include both helpful and harmful results that can affect the caster, the entire party, or the enemy. The goal with Bewildering Grace farming is to try and use it enough times in the hope that you’ll activate one of the three experience boosts. Ranging from x2, x5, and a whopping x100 multiplier, these boons can catapult your team through the levels if you’re lucky enough to activate them during a fight.
The trick to farming with Bewildering Grace is learning how to mitigate the negative and potentially lethal effects it can throw at you. Aside from one of two devastatingly destructive and unavoidable rare outcomes, your party should be able to shrug off most of the negative outcomes without issue, but there is one fairly troublesome party-wide silence you can plan around. The silencing mist affects the party for a number of turns and if you’re farming against enemies that are at or around your current party level, having your entire team silenced can easily lead to a teamwipe. To counter this, either stock up on anti-silence consumables and try equipping the anti-silence amulet you get by scrutinizing the silent merchant hiding in the alleyway between the weapon and item shop in Rippletide.
If you’re looking to speed up the number of casts of Bewildering Grace you activate per turn, the spell can be enhanced with the Cleric divine skill which causes it to be cast twice. This means if you cast a fully boosted Bewildering Grace while buffed with the Cleric divine skill, you can get a total of eight potential Bewildering Grace effects on that turn. Be warned however, that there is no stopping this once cast, and while the effects are random, fate has a nasty habit of stacking bad outcomes against you more often than not.
8. Where to Find the Captain’s Badge and Badge of Friendship
If you’re still trying to level out any remaining characters and looking for a way to give yourself a bit of a passive boost, there are two accessories up for grabs that will automatically increase your experience and JP earned from every battle for the entire team. To find these accessories however, you will need to have finished a couple of the main storylines for two specific characters.
To find the Badge of Friendship which boosts JP gained after battle, you will need to have completed Ophelia’s entire storyline. Once you’ve wrapped up her chapter four mission, head on over to the upper area of Saintsbridge and talk to Emil (the small child you encountered during chapter two). Accept Emil’s sidequest, and then proceed across the bridge towards the lower Saintsbridge area. Here you should see a small child near the foot of the bridge. Use either the Purchase or Steal path action on the child and get the River Blossom, then head back to Emil to finish the quest and obtain the Badge of Friendship.
To find the Captain’s Badge which boosts experience gained after battle you will have to complete both Olberic’s and Ophelia’s storylines. Once you’ve wrapped up both of them head on over to Wellspring and talk to the Captain in the house on the west side of town. Once you’ve got the quest, fast travel to Goldshore and either Scrutinize or Inquire Bishop Donovan inside the cathedral before heading back to the captain in Wellspring. Once complete, you should now have the Captain’s Badge in your possession.
Andy Moore is a gaming freelancer based in the UK. When he’s not writing, he can be found staring blankly out of the nearest window, or spending way too much time on Twitter.