Bloodstained is nothing if not faithful to the Castlevania games of old. With its winding, labyrinthine map, it’s easy to get stuck on what to do next, be it at the mercy of a dead end or a particularly difficult boss. There’s more than a few challenges waiting to test your skills, so we’ve come up with a few tips to help you along your way. While most of these are there to help you build a better character loadout, the final tip is there to help if you’re getting stuck at a specific point in the game, so we’ll be referencing a few minor spoilers to help explain things better.
The difference between Grade and Rank on shards
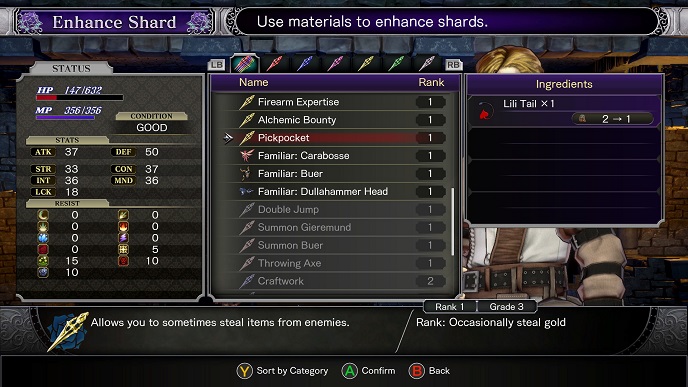
Throughout your journey in Bloodstained you will find yourself acquiring a number of skill shards with varying uses. These skills can be offensive maneuvers, magic spells, utility bonuses and so forth, and while they differ greatly in how they are used, almost every shard can be upgraded a couple of different ways. The two primary upgrades come in the form of Grades and Ranks, and while it may seem like these two meters perform the same function, there is an important distinction to be made between the two.
Increasing a shard’s Grade will directly improve the impact of the skill in question. For offensive abilities this usually means an increase to the damage output of the skill per hit, whereas for passives this usually serves to increase the bonus of whatever the skill is granting. To increase the Grade of a skill, you simply need to acquire more skill shards for that ability. Because of this, raising a shard’s Grade intentionally can be quite difficult as you’ll have to rely on chance for shards to drop from that specific enemy each time you defeat it.
Increasing a shard’s Rank will have a more noticeable effect compared to that of the Grade as Rank increases will typically evolve the ability in some way, adding new functionality in the process. For offensive abilities this usually presents as an increase to the number of attacks produced per ability use, and for passives this will typically add extra effects to the skill. Increasing a shard’s Rank is a much more deliberate act that is done through Johannes’s alchemy bench back at the safe house. By using crafting materials, each skill can be Ranked up, with the intended effects displayed at the bottom of the screen so you know exactly what kind of effect you’re going to achieve.
Sell your unwanted shards
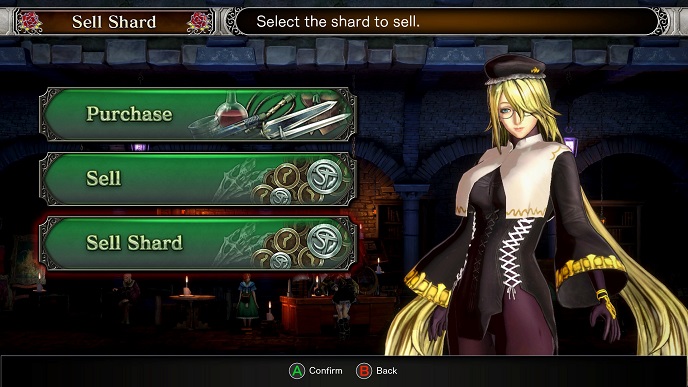
Almost every enemy in Bloodstained has the potential to drop a skill shard, and while these lucrative monster skills can be a great boon in certain situations, sooner or later you may find yourself hoarding a surplus of these abilities. While owning multiples of a skill helps boost the overall potential of its effectiveness, sooner or later you’ll find a small section of skills that work well for you, leaving the rest to sit in storage collecting dust.
While it may be difficult to part with these shards if you’re inclined towards collecting and hoarding every skill in the game, making the difficult decision to part ways with your unused shards can be a great way to increase your coffers, giving you extra cash to spend on more important items like consumables. It may not seem like it during the early hours of the game, but as you progress later on, buying potions and high potions will soon start to eat up a large chunk of your disposable cash, so by selling off these unused shards you can help to remove some of the expenses you’ll be amassing later on.
Find and craft unique weapons with the 8-Bit coin
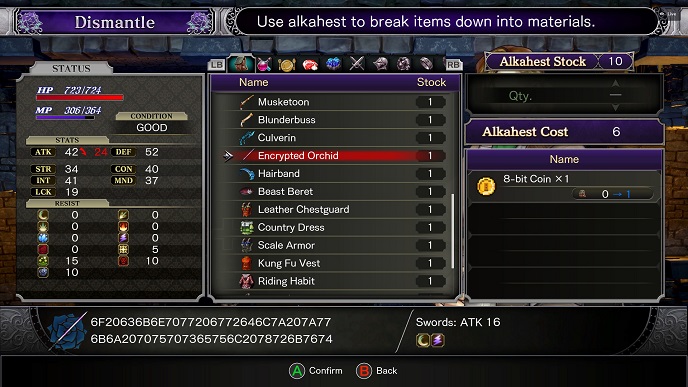
There are a handful of unique weapons that you can obtain early on in the game to help give you a bit of an advantage, providing you find the special material required to craft them. To obtain these weapons from Johannes’s crafting bench, you’ll need to first obtain the 8-Bit coin, which is located in a hidden room to the right of the save room next to Johannes. To get inside the room, you will need to leave the safe house and head right until you reach the drawbridge leading in the castle. Raise the bridge and drop into the area below, then take the path left past the rats until you reach a wall and a ledge leading upwards. Smash the wall on the left to reveal a hidden room, and the coin can be found in a chest in the corner.
Once you’ve acquired the coin, head back to Johannes and you should now have access to a number of unique weapons of each type, with each one offering extra abilities like elemental bonuses and special techniques that can be unlocked with a little experimentation. If you’re having trouble deciding which weapon to take, you can always get the coin back by dismantling it at Johannes’s bench too, so feel free to test out each weapon until you find one that suits you.
Make use of the familiars
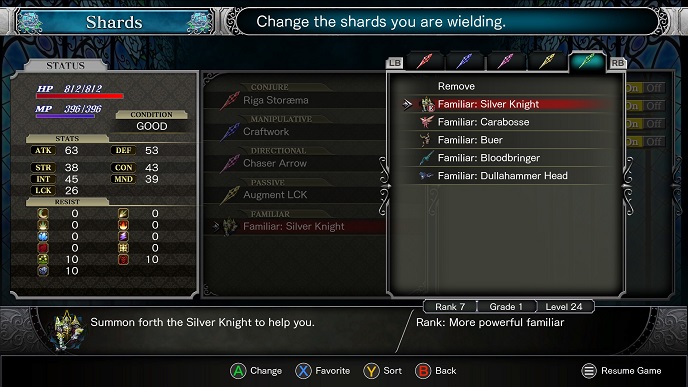
Familiars are a special type of shard that work much in the same way as passive shards, except that they summon an ally that helps you out independently. Each familiar does something different and some are much better than others. A good example of this is the Caraboose, which has the potential to heal you sporadically whenever you take damage. The problem however is this is unreliable at best and requires the use of a fairy potion which doesn’t drop very often. By upgrading the familiars, they can learn new abilities which make them much more of an asset than their Rank 1 counterparts, so once you’ve found a familiar that you like be sure to keep it out at all times and spend some materials getting it ranked up as soon as possible.
By far the best familiar to aim for is the Silver Knight, which can be found on the upper path located to the right of the room where you fight the Stained Glass spider boss Craftwork. You will need to have obtained the Double Jump ability before you can reach this area, but once you get there the familiar can be found in the green skill shard altar at the end of the room. While the Silver Knight doesn’t have the most offensive skill set, he does possess the ability to periodically negate projectiles from enemies, which can be extremely useful when fighting against some of the later enemies that have a tendency of bombarding you with lethal barrages. Ranking up the Silver Knight also gives it access to an extra screen-wide ability that summons several spears of light to attack enemies from below.
Obtain the True Arrow Shard to help win early boss fights
One of the earliest directional shards you can get is called True Arrow, and while it doesn’t look all that special, by making a few tweaks here and there you can turn it into a boss killing powerhouse. The skill itself is fairly simple; you aim and shoot, causing three arrows to arc across the screen towards your target. Each arrow that hits will have its own tick of damage, and if you’re close enough you can usually get all three arrows to hit the same enemy, which by itself can sometimes be enough to one-shot kill weaker foes. Upgrading True Arrow arrow’s rank will increase the number of arrows fired, further increasing the amount of damage this low cost spell can dish out. To obtain True Arrow, you simply need to spend some time farming the Barbatos archer enemies located in the Garden Of Silence early on in the game.
Once you’ve got your hands on the shard and upgraded it a few times, the next thing you want to do is reach the Livre Ex Machina library area, where you can find the Vampire librarian OD. Among his selection of books is a volume called the Deadeye Tome, which passively increases the damage dealt by any directional shard. Stacking this on top of your already boosted True Arrow shard acts as the perfect weapon against difficult demons and tough bosses alike, and since the ability itself only consumes 30 mana per use, you can make short work of most enemies once you’ve setup this killer combo.
Get the Detective’s Eye Shard
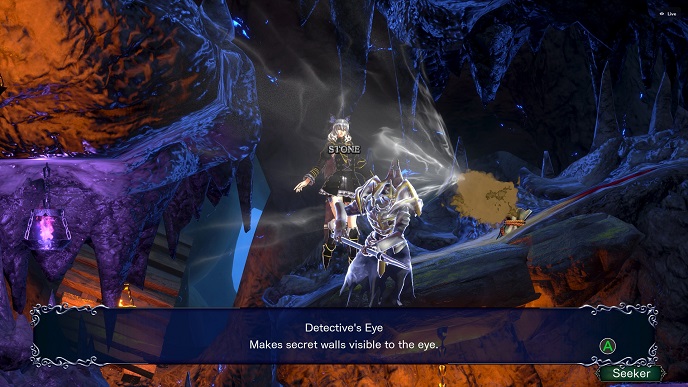
It wouldn’t be a Metroid homage if there were no secrets to be found hiding in plain sight, and in Bloodstained the majority of hidden trinkets and upgrades come in the form of items stashed behind damaged walls. The only problem is that these secrets appear just like any other wall in the game, so they are easy to miss. Unless you’re methodically swinging your weapon at every single section of wall in the game, sooner or later you’re going to overlook at least one of these caches. Fortunately, with the help of the Detective’s Eye passive shard you can light up these walls by simply walking past them, leaving you more time to focus on staying alive.
To obtain the Detective’s Eye shard you will need to unlock the Forbidden Underground Waterway area, which is accessed after obtaining the ability to absorb blood and draining the blood pool near the entrance of the castle. Once you reach the Waterway you need to locate an area where Seekers spawn. You’ll know you’re in the right place when you find giant eyeballs rolling around with a large dust trail behind them. The drop rate on this shard is fairly lenient so spend some time slaying these rolling orbs and you’ll eventually get the ability.
Upgrade passive shards to Rank 9
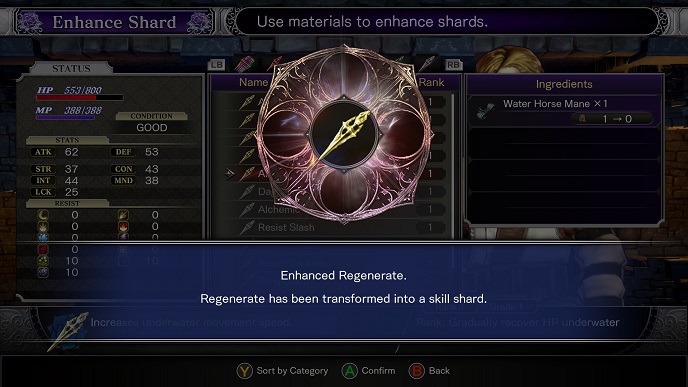
If you’re struggling to choose from the extensive list of lucrative passive shards available in the game then you’re in luck, as every passive shard can be converted into an always-on skill shard providing you have enough materials to fully upgrade it. After reaching upgrade Rank 9, passive shards will automatically jump into the active skill list, allowing you to toggle their effects on and off at will. By upgrading your favorite passive shards, you can free up the slot to further augment your loadout with another passive instead.
Since the cost to upgrade a passive shard to Rank 9 can sometimes be quite crippling, when deciding which passives it would be a good idea to focus on the shards that help you get more rewards initially, so as to help when trying to upgrade the remaining shards later on. The Augment Gold, Augment LCK, and Pickpocket shards are great at helping you passively obtain more coinage and materials to help progress the remaining shards, and it’s worthwhile farming the Sidhe fairies in the Underground Sorcery Lab for the Healing maintained shard, which can be upgraded into the Regeneration shard passive, and ultimately into a Rank 9 active skill shard to give yourself a constant minor health regeneration buff.
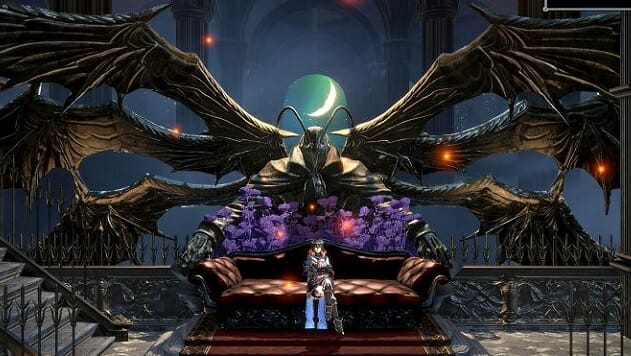
How to avoid the “Bad Ending” (Spoiler warning)
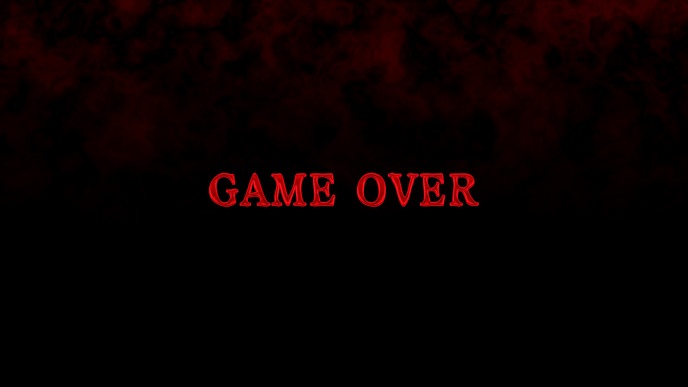
At a certain point in the game you’ll encounter protagonist Gebel alone in his golden palace in the Hall of Termination. If you’ve not completed a certain set of criteria throughout your time in the castle, then winning this fight will give you the bad ending, treating you to a brief epilogue where nothing is resolved and presenting with an anticlimactic Game Over screen. To avoid this, you will need to obtain the Zangetsuto from the second fight with Zangetsu. The second Zangetsu encounter can only be initiated once you reach the Oriental Sorcery Lab located in the top left corner of the castle, but to get there you must first obtain the remaining utility skills like Deep Sinker, Aqua Stream, Blood Absorb, Double Jump, Ray Reflector, and Invert.
After obtaining the Zangetsuto, head back into the fight with Gebel but make sure you don’t kill him. Instead your goal here is to wait for the moon in the distance to turn red, and then strike it with the Zangetsuto to end the fight. Once this has been done, head back to the Garden of Silence and find the open balcony area on the upper levels with the red moon in the distance. Slash it again with the Zangetsuto and you will unlock a new area that leads to the true enemy of Bloodstained.
Andy Moore is a gaming freelancer based in the UK. When he’s not writing, he can be found staring blankly out of the nearest window, or spending way too much time on Twitter.