
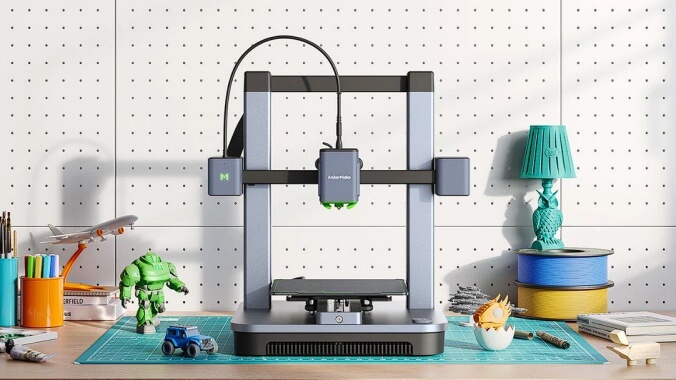
AnkerMake M5C: A More Compact, Lower-Priced Intro To 3D Printing
Images via AnkerMake
AnkerMake is back with a new printer, a sort of younger sibling to their M5 printer, called the M5C. The C stands for compact, and it is smaller than the bulky M5 by a noticeable amount. The M5 was a decent printer overall, but ours ended up having technical issues months into use. At the $700 price point, the M5 was also severely overshadowed by comparably priced, more feature-laden alternatives from upstart 3D printer maker, Bambu.
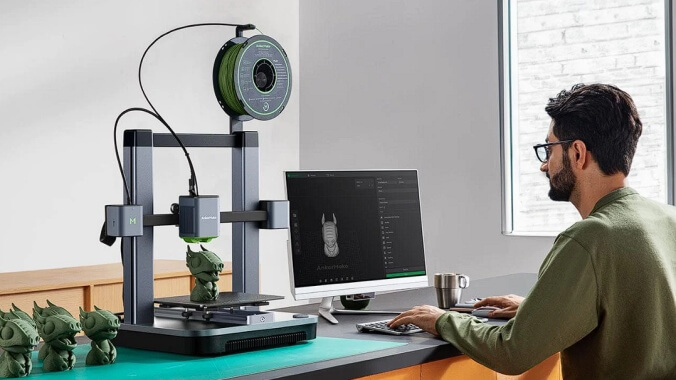
At $400, the M5C is in a more comfortable lower-end price category of printers and definitely feels like a better deal. The problem is there’s a lot of competition in this range, many of which offer similar if not better specs (on paper, anyway). AnkerMake is marketing the M5C as a plug-and-play type of printer for newbies and that’s proven only partially true during my testing.
The main two-piece assembly did go together in around 15 or so minutes and was pretty easy overall. From there, you sync the printer to the phone app, let it auto-level, load filament and are off to the wondrous world of 3D printing. AnkerMake provides its own downloadable slicing software for beginners to use, complete with an easy mode to get you started, but thankfully using other third-party slicers like Cura and PrusaSlicer is an option.
There are several noteworthy design improvements in the M5C compared to the M5. Most important is the brand new, all-metal hot end. The new design allows it to reach a temperature of 300 degrees C, allowing for the use of a wider range of potential filaments and hopefully generally improved performance. The print bed is smaller at 220x220x250mm, as opposed to the M5’s 235x235x250mm-sized bed. It’s also a lot quieter than the M5. The fans don’t constantly run when it’s on and produce noticeably less noise while printing.
One of the strangest changes is the lack of any sort of display to control the printer. There’s no screen at all and the printer relies entirely on either the app or the AnkerMake slicer to control it. Instead, the M5C now has a big button on it that can perform certain tasks depending on what the printer is doing. For instance, during a print, it will pause and resume printing. While idle, pressing the button when a USB-C drive is plugged in will cause it to automatically print the latest file on it.
This solution isn’t really a great replacement for an actual interface display, but there is a certain convenience in being able to stop a print quickly if needed or start one with just the press of a button. There’s also no built-in camera to monitor prints and the M5C ditches all those AI-based features from the M5 entirely. While we did miss the camera, the M5’s AI functionality never worked right anyway, so isn’t much of a loss.
The M5C sports the same 250mm/s-500mm/s print speeds, but speed in printing is always a moving target. It’s definitely faster overall than older printers, though there’s plenty of competition available now that claims to hit the same high speeds. There are also quality compromises at the highest speed, where print details can suffer.
The printer still includes a filament run-out sensor, automatic bed leveling, and a nice PEI soft magnetic plate for printing on. It also looks good, compared to a lot of the competition, with a solid heavy base and a nice minimalist design. The bed rails are simpler in design too and the printer is very easy to adjust.
That ease of adjustment is important because the odds are very high you’ll need to tweak things to get it printing just right. This involves tightening or loosening belts and the eccentric nuts for the wheels that hold both the bed and print head to those moving belts. The printer comes with a handy tool kit, but understanding how and why these things need to be adjusted is a bigger issue.
Here we have problems that go for any printer, where the stock machine arrives and may or may not be reasonably well configured. The issue, especially for newcomers, is wrapping your head around just how complicated 3D printers can be. There’s a distinct learning curve that requires research and getting help far beyond the limited documentation AnkerMake provides.
Getting up to speed with the intricacies of 3D printing in general and the M5C specifically means a lot of internet searching, browsing Reddit and taking time to ask for advice in the official AnkerMake Discord. AnkerMake’s site has a lot of how-to guides as well, which are helpful if you know what you’re looking for, but asking for help will almost certainly be a thing for users at some point.
Printing with standard PLA filament is easiest and provided good results from the start, but it quickly became clear that some things needed tweaking. Belts had to be tightened, eccentric nuts for the axis wheels needed adjusting, and the z-offset setting had to be experimented with until a happy medium could be found.
Adjusting things is relatively simple to do but is largely based on feel. Does the hot end assembly and print bed slide smoothly with no bumps? Are they rock solid or is there any wiggle? Do the belts seem tight, but not too tight? There are a lot of questions like this that users can only confidently answer with time and experience.
When printing with the rubber-like TPU filament, I also ended up having to tighten the extrusion tension spring to get it to properly feed the material through. This involved popping off the plastic housing of the hot end and tightening yet another screw. From there, I had to spend more time experimenting and tweaking the TPU material profile in the slicer (in my case, making it hotter and slowing the speed down helped immensely). In the end, though, it worked and I was able to get very decent flexible prints.
I had good luck with the three distinct types of filament material I tried (PLA, TPU, and PETG), but it took some tweaking to get there. Therein lies the problem with the M5C. It’s a good, solid machine overall, but definitely not as plug-and-play friendly as it wants to be. It’s pretty easy to adjust thankfully, but there’s a lot of competition in this price range. Many of those other printers not only have built-in screen interfaces but offer larger bed sizes and supposedly comparable speeds.
I like the M5C overall more than the M5, especially given its lower price point while still having the same solid and stylish design and build quality. It’s performed well in a variety of tests and prints, even if there was a fair bit of tweaking to both the hardware and software profiles, and is thus far proving to be a reliable, quality 3D printer.